
Getting Started With Raspberry Pi 6
[otw_is sidebar=otw-sidebar-1]
In this article I will let you go through the basics of Raspberry pi and the general overview of the setup required to run a Raspberry pi. After reading this article you will learn about the Raspberry pi hardware i.e. about its GPIO pins, several communication ports available on board, power supply rating for the Raspberry pi, Operating System of the Raspberry pi. You will also be able to differentiate between the Microcomputers, Microcontrollers and Microprocessors. In short this article is best for the beginners in the field of programming and engineering. This article is simple to read so keep reading and enjoy learning.
Whether you are electronics Hobbyist, Engineering enthusiast or research student you must have listen the word “Raspberry Pi”. So let’s start with the simple question
What is Raspberry pi?
A Raspberry Pi is a micro-computer with the microprocessor, graphics chip, memory, USB Ports, HDMI output, Ethernet port, Wi-Fi and Bluetooth module all integrated on a single PCB which makes it a stand-alone device. The Raspberry pi can be connected to the input devices as keyboard, mouse and output devices as the LCD or monitor and thus can be programmed or controlled without the need of any other device. It can also be connected to the personal computer through proper networking protocols and programmed by the personal computer via dedicated softwares. The Raspberry Pi can perform many tasks that the PC does like gaming, word processing, spreadsheets and also play HD videos. To work with the Raspberry proper Operating System should be installed on it. A Raspberry Pi does not come with the already installed OS so OS needs to be installed to make Raspberry Pi useful. I will let you know how to install the OS on the Raspberry Pi in coming discussion. For now we will stick to learn the hardware of the Raspberry Pi.
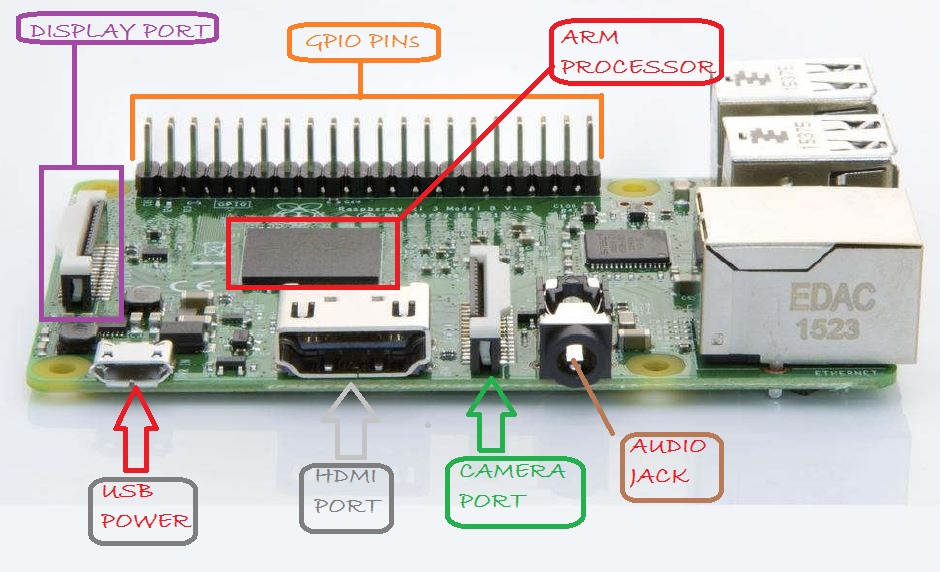
Board Overview:
Before discussing the board specifications keep in mind that there are various models of the Raspberry Pi:
- Raspberry Pi 1 model B
- Raspberry Pi 1 model A
- Raspberry Pi 1 model B+
- Raspberry Pi 1model A+
- Raspberry Pi Zero
- Raspberry Pi 2
- Raspberry Pi 3 model B
- Raspberry Pi Zero W
Note that Raspberry Pi 3 model B+ is the latest model of the Raspberry Pi so I will discuss only it in detail. The board looks like the one in the following image. Some of the components of the Raspberry Pi board are labeled in the image. Now I will discuss each labeled part one by one. First of all consider the General purpose Input/output (GPIO) pins as these are the interfaces which let the board communicate the outer world.
Raspberry Pi Pins:
[otw_is sidebar=otw-sidebar-3]
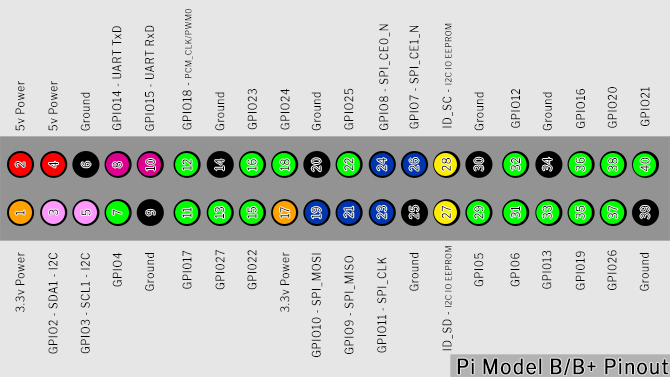
The Raspberry Pi can be connected to a lot of sensors and actuators like Distance sensor, Light sensor, Motion sensor, Temperature sensor, relay, leds, motors etc. through its GPIO pins. A lot of transducers can be connected to the Raspberry Pi according to the requirement of task.here are a total of 40 pins on the GPIO header of the Raspberry Pi 3 Model B+. Some of the pins are configurable and some are not. By configurable I mean that these Raspberry Pi GPIO pins can be accessed via dedicated programs and function to serve as either an Input or an Output. A complete guide of how to program the Raspberry Pi and use its GPIO pins to perform interesting feats will be discussed in the coming sections. The non- configurable pins are the Raspberry Pi power pins.

Let us discuss the Raspberry Pi GPIO pins in some detail.
Raspberry Pi Power Pins:
-
PIN 2 and 4:
Raspberry Pi can be powered up either through a USB power port or 5V pins on the GPIO header of the Raspberry Pi. Pin number 2 and 4 represented in red color in the above image are the 5V pins. These two pins can either be used to power up the Raspberry Pi or can be used to power up other modules you are working with in the project for example Arduino or any sensor. By the way it is not a good approach to connect the power source to the 5V pins as these Pins do not have a regulator or a fuse so any current surge in a line can damage your Raspberry Pi. The maximum current provided by the Pins 2 and 4 depends upon the power supply of the Raspberry Pi. That is if you use a power supply of 2A on micro USB port the maximum current of 1.5A will be provided by the Pins 2 and 4.
Raspberry Pi Ground pins:
Total 8 Ground pins are present on the Raspberry Pi board. All of them are connected internally so you can use any of them without any difference. Any sensor or actuator can be powered up via Raspberry Pi through the 5V and Ground pin. Pin number 6, 9, 14, 20, 25, 30, 34, 39 represented by black color are the Ground Pins.
- 3V pins:
Pins number 1 and 17 are the 3.3V pins. These pins are also used for powering the modules that work on 3.3 volts. These pins can provide a current of 500mA to the sensors or modules. These pins are represented by yellow color in the above image.
In short these pins are just for powering up. The actual power of Raspberry Pi lies in the standard GPIO pins discussed below.
Raspberry Pi General Purpose Input/Output Pins:
[otw_is sidebar=otw-sidebar-3]
The Raspberry Pi can support almost all of the sensors supported by other Micro-controllers as long as they work at 3.3 volts. Unlike the Arduino Raspberry Pi has only digital pins and analog pins are not present on the Raspberry Pi so you need to design the code so that your Raspberry Pi can work with analog sensors.s can be seen in the chart GPIO pins are represented in different colors. Those represented with green colors are the standard GPIO pins. These are the pins which we use in our basic beginners project. As told earlier these pins can be configured as either Input or an Output. When configured as an input various sensors can be connected to the Raspberry Pi but it should be kept in mind that voltage greater than 3.3V will fry up your Raspberry Pi. Raspberry Pi standard GPIO pins works at 3.3V. Similarly when configured as an output Raspberry Pi delivers 3.3V to the actuators from its GPIO pins. Before we discuss the special purpose GPIO pins remember all the GPIO pins except pins 27 and 28 can be used as regular GPIO pins.
Following is the list of some of the sensors you can connect with Raspberry Pi to perform cool feats.
List of sensors to be connected with Raspberry Pi GPIO:
- Humidity and temperature sensor
- Barometer
- Soil sensor
- Gas Sensor
- PIR Motion Sensor
- HC-SR04 ultrasonic sensor
- Magnetic Switch / Reed Relay
- Infrared distance meter
- RFID-RC522 – Inductive RFID card reader
- Gyroscope
- HMC5883L / GY-271 Compass
- Accelerometer and many more.
The image shows the interface of simple LDR with Raspberry Pi. This is the simple example of how to use GPIO pin as input to be connected with the analog sensor i.e. Light Dependent Resistor. Similarly a lot of sensors can be connected to the Raspberry Pi. I will discuss basic projects exploiting the GPIOs in the coming articles.
Inter-Integrated Circuit (I2C):
Pins 3 and 5 are the I2C pins. These pins let the Raspberry Pi talk to the devices that support I2C protocol. In short these pins are used for communication purpose.
Serial-Peripheral Bus (SPI):
Pin number 19, 21, 23, 24, 25 are the SPI pins. Like the I2C pins these pins are also used for communication purposes. These Pins let the Raspberry Pi talk to SPI devices.
UART:
Pin number 8 and 10 are the serial pins used to communicate with other devices.
A complete tutorial of these Special Purpose GPIOs will be discussed in the coming articles. Now let’s discuss the CSI Camera Port.
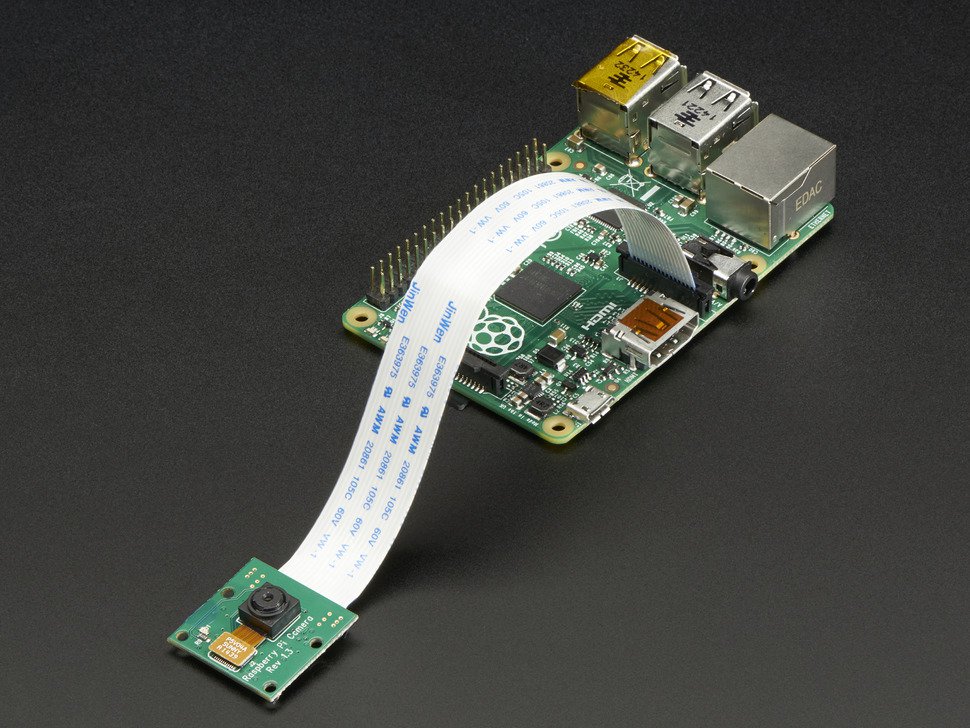
Camera Port of the Raspberry Pi:
Camera port is the thing which makes the Raspberry Pi stand out the Micro-controllers. It is used as an interface between the Raspberry Pi and the Camera. There are a lot of applications we can do with the Camera and Raspberry Pi. The Camera interface with Raspberry Pi is shown in the image.
We can do a lot of Image processing and Surveillance projects using the Pi camera.
HDMI port:
The HDMI port is used to connect the TV or monitor to the Raspberry Pi via High Definition Media Interface Cable. The image shows the interface of the Raspberry Pi and LCD. By connecting the monitor to the Raspberry Pi we can directly interact with the Raspberry Pi without the need of PC and can program the Raspberry directly. I will discuss the complete of the raspberry Pi in the next article.
[otw_is sidebar=otw-sidebar-2]
Display Port:
The Display port is used to connect the touch screen to the Raspberry Module. The complete tutorial will be discussed later in the next articles.
Features of the Raspberry Pi:
The full specs of the Raspberry Pi 3 are the following
- CPU: Quad-core
- GPU: 400MHz
- Memory: 1
- USB ports: 4
- Video outputs:
- Network: 10/100Mbps Ethernet and 802.11n Wireless LAN
- Peripherals: 17 GPIO plus specific functions, and HAT ID bus
- Bluetooth: 4.1
- Power source: 5 V via Micro-USB or GPIO header
I hope this article would be helpful to you. In the next article I will discuss about how to install Operating system in the Raspberry, how to interface it with the LCD and the LED blinking code. Stay connected and “Happy Learning”.
Very nice and informative article about Raspberry Pi. This article would be very helpful to the people who are interested in electronics as hobby and also who wants to develop applications . Keep up the good work.
Wow, fantastic weblog layout! How long have you ever been running a blog for?
you make blogging look easy. The entire look of your website is magnificent, let
alone the content! You can see similar here sklep online
Wow, incredible weblog structure! How long have you been running a blog
for? you made blogging glance easy. The whole glance of your site is wonderful, let alone the content material!
You can see similar here dobry sklep
Wow, awesome blog layout! How long have you ever been running a blog for?
you made running a blog look easy. The total glance of your website is wonderful,
let alone the content material! You can see similar here dobry sklep
Wow, fantastic weblog format! How lengthy have you been blogging for?
you made blogging look easy. The entire look of your site is
wonderful, let alone the content material! You can see similar here najlepszy sklep