

Enabling the SPI port In Raspberry Pi 4
[otw_is sidebar=otw-sidebar-1]in this tutorial we will learn Enabling the SPI port In Raspberry Pi. In the previous articles I have discussed about the I2C serial communication and how to enable the I2C port in the Raspberry PI. In the same way this article will be oriented around the SPI communication. Like the I2C serial port Raspberry PI also has the SPI interface but it is disabled by default too. So we need to first enable the SPI port in the Raspberry Pi. This can be done by typing some simple commands in the terminal window of the Raspberry Pi.
[otw_is sidebar=otw-sidebar-3]
Enabling the SPI port In Raspberry Pi
In this article I will discuss about how to enable the SPI port in the Raspberry Pi and about SPI serial communication. So sit back keep reading and enjoy learning.
WHAT IS SPI Interface:
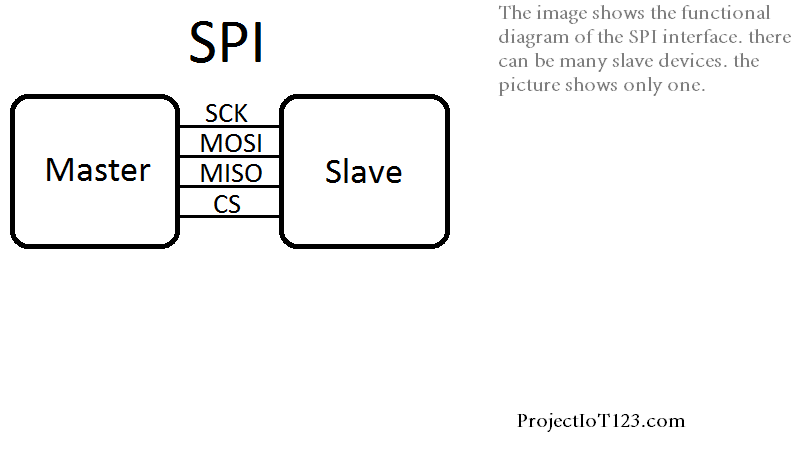 Serial Peripheral Interface (SPI) is a synchronous (that is synchronized by the clock signal) serial communication protocol. Serial Peripheral Interface can support full duplex communication that is it can send data and receive data on the same bus. Unlike the I2C (inter-Integrated Circuit) serial communication the Serial Peripheral Interface uses four lines which are specified as follows:
- CLK (clock signal that is used to synchronize the data from and to the Master and salve).
- MISO (master input slave output).
- MOSI (master output slave input).
- CS (chip select).
[otw_is sidebar=otw-sidebar-2]
Let us discuss functionality of each line of the Serial Peripheral Interface bus. As the name implies the MISO line is used to transfer data from master device which in our case is Raspberry Pi to the slave device. In the same way the MOSI line is used to transfer data from the slave device to the master device. Last but not the least the chip select line which is used select the slave device that is intended to communicate with the master device. Note that the SPI interface also uses the master-slave architecture.
There are number of devices which uses the SPI interface to communicate with other devices. So if you are using the Raspberry Pi in your projects it becomes necessary that Raspberry Pi is able to talk to the devices that uses SPI serial communication.
SPI interface of the Raspberry Pi:
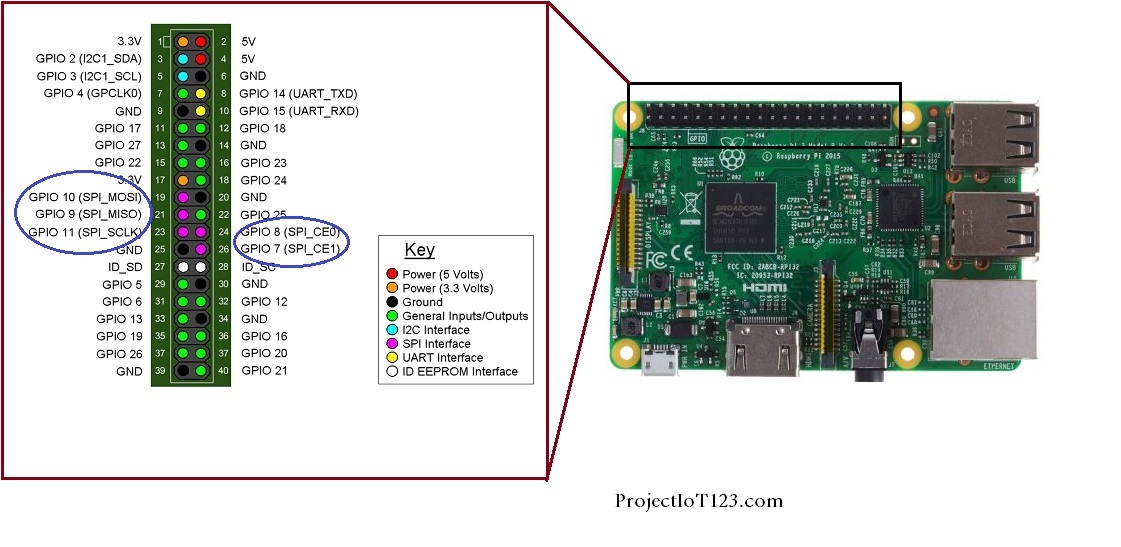 The SPI interface of the Raspberry Pi as described earlier is disabled by default. Before diving into the steps to enable the SPI interface of the Raspberry Pi let us see the pin out of the Raspberry PI.
As can be seen in the above image the Raspberry Pi has the SPI interface at the GPIO pin number 10, 9, 11, 8 and 7. These are the general Purpose Input/Output pins by default and can be configures for additional functionality such as in this will be configures as the SPI interface. So now let us see how the SPI interface at the Raspberry Pi can be enabled.
Enabling the Serial Peripheral Interface:
Now I will take you through the steps of enabling the Serial Peripheral Interface is Raspberry PI.
[otw_is sidebar=otw-sidebar-3]
Step1:
First of all open the terminal of the Raspberry Pi.
Step2:
Now type the following command in the terminal window of the Raspberry Pi.
sudo-raspi-config
Now press enter and the window will appear in front of you.
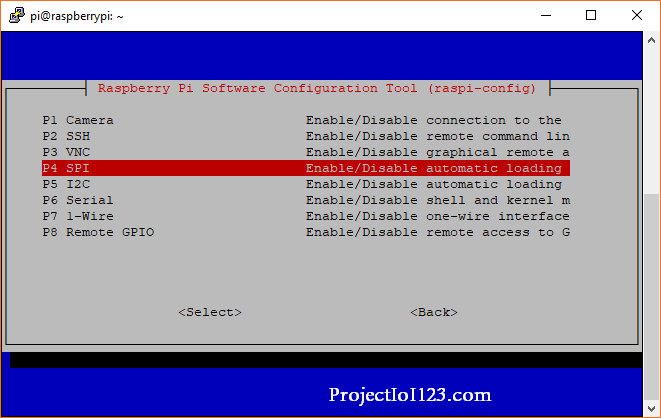
Step3:
The window will have the option of “Interfacing option”. Click on it and another will appear in front of you as shown in the following image:
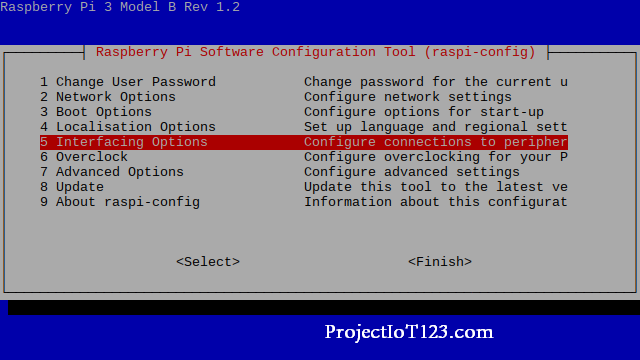
 Step4:
Now click on the SPI interface on the window as shown in the following image.
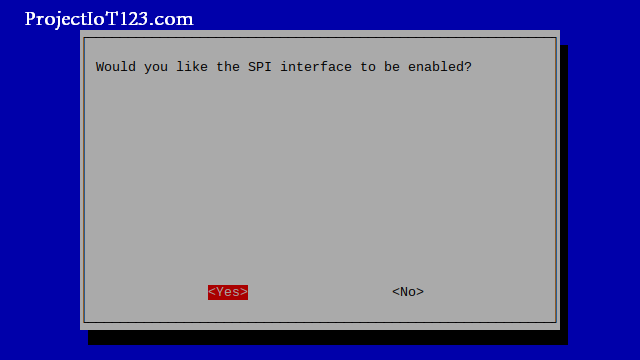
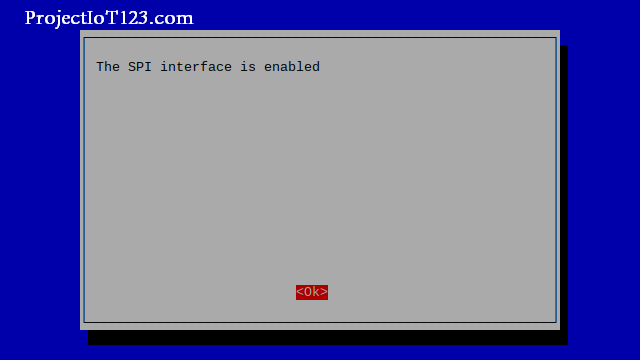
 Step5:
The dialog will appear click “yes”, another dialog will appear also click “yes” as shown in the following image.
Step6:
Now reboot the Raspberry Pi by typing the following command in the Raspberry PI terminal window.
sudo reboot
[otw_is sidebar=otw-sidebar-3]
After you restarted the Raspberry Pi the Serial Peripheral Interface will be enabled in your Raspberry Pi.
That is all by following the above mentioned steps you can easily enable the Serial Peripheral Interface (SPI) port in the Raspberry Pi and you will be able to communicate with a number of devices that uses Serial Peripheral Interface for serial communication(Enabling the SPI port In Raspberry Pi).
In order to write the Python program to set the communication between Raspberry Pi and any of the slave device using the SPI serial communication you need to download the library in the similar way you downloaded it for the I2C (inter-integrated circuit) serial communication. I will discuss the serial communication between the Raspberry Pi and the slave device using the SPI interface and the Python code in the next post.
Till then take care keep reading and enjoy learning…
Wow, amazing weblog format! How lengthy have you ever been running a blog for?
you made running a blog glance easy. The total glance of your
website is fantastic, let alone the content! You can see similar here
sklep online
Hey! Do you know if they make any plugins to help with Search Engine Optimization? I’m trying to get
my blog to rank for some targeted keywords but I’m not seeing very good results.
If you know of any please share. Cheers!
You can read similar art here: Hitman.agency
Now I am going away to do my breakfast, once having my breakfast coming again to read further news.
My blog post vpn special code
Pretty! This was an extremely wonderful post. Thank you
for providing this info.
Feel free to visit my webpage :: vpn special code