

raspberry pi gui based home automation using python 2
[otw_is sidebar=otw-sidebar-1]
In this post I will discuss about how to build the Home Automation System based on the Raspberry Pi using the Graphical User Interface in the Python language. In the previous post I have already how to build the simple Graphical User Interface in the Raspberry Pi using the Python language but in that I have only discussed the basics of the Raspberry Pi Graphical User Interface that is the commonly used functions for the Raspberry Pi GUI and the library required to program for the Graphical User Interface based on the Python programming language. I am focusing on the Python because it is the most common used programming language for the Raspberry Pi. In this post I will also provide the summary of the library and the functions.
[otw_is sidebar=otw-sidebar-3]
Raspberry Pi Simple GUI Based Home Automation Using Python
After reading post you will be able to build your own Home Automation System based on Raspberry Pi Graphical User Interface. You will learn about the library and the functions required for the GUI, the hardware for the Home Automation System and the user defined in the Python language. So sit back, keep reading and enjoy learning.
Equipment Required:
You will need the following equipment for the sake of this post:
- Raspberry Pi model B+.
- A laptop.
- Breadboard.
- Jumper wires.
- Relay module.
- Bulbs.
[otw_is sidebar=otw-sidebar-3]
Raspberry Pi Graphical User Interface:
The Raspberry Pi is a micro-computer with the functionality equal to the normal Desktop computer. One can do anything with the Raspberry Pi that can be done with the Personal Computer. The recommended Operating System for the Raspberry Pi is Raspbian which can be installed in your Raspberry Pi by following the simple steps. I have discussed the installation of the Raspbian in the Raspberry Pi using the Laptop in one my posts read that post if you are new to the Raspberry Pi. I am here assuming that you have already installed the Raspbian Operating System in your Raspberry Pi. Raspberry PI is popular in the Internet of Things (IoT) applications. It has built- in Bluetooth and Wi Fi, the Raspberry Pi model B+ which I am using in this post has four Universal Serial Bus (USB) ports on it, one High Definition Media Interface port for connecting the HDMI monitor to it, micro USB port for the power supply and 40 pin header for the GPIO pins. The benefit of the Raspberry Pi Graphical User Interface is especially useful when working with the Touch Screen so the Raspberry Pi and the touch screen becomes the stand-alone module for the Home Automation System I have already discussed the interface of the Touch Screen with the Raspberry Pi but here I am using the laptop for the sake of this post as this post will be serving the tutorial for the Raspberry PI GUI based Home Automation System only. The GUI in the Raspberry Pi can easily be build using the Python programming as you will see shortly.
Python Libraries for the Graphical User Interface:
In the previous post I have already discussed the library that is used for the Graphical User Interface programming in the Raspberry Pi and the commonly used functions. I am here just discussing the summary. The Python library that holds the functions for programming the Graphical User Interface is called Tkinter, this library is already installed in the Raspbian Operating System and you do not need to download any library or support package to build the Home Automation System based on the Raspberry Pi Graphical User Interface. It is good if you are new to the Raspberry Pi as you will need not to connect the Raspberry Pi to the internet by the way I have discussed in one of most about how to connect the Raspberry Pi to the internet using the Wi Fi or Ethernet cable. The second library that we will be using for Graphical User Interface is called the tkfont as the name implies this library consist of the functions that can be customize the text used in the Raspberry Pi GUI that is for example if you use the name “Relay1” for the button that controls the first you can modify the font style, font size and weight of the text using the functions in this library. The final and the last library that we will import in the code for Raspberry Pi based Graphical User Interface is RPi.GPIO this library allows the Python language to manipulate the state of the GPIO pins of the Raspberry Pi. as we want to turn the on and off the signal on the Raspberry Pi so we will be needing this library in our code. Other important functions will be discussed in detail one the code is written.
python simple gui:
[otw_is sidebar=otw-sidebar-3]
Let us discuss the overview of hardware required for the Raspberry Pi GUI based Home Automation System. The block diagram of the Raspberry Pi Home Automation system usinf the Graphical User Interface is shown as follows we make python simple gui
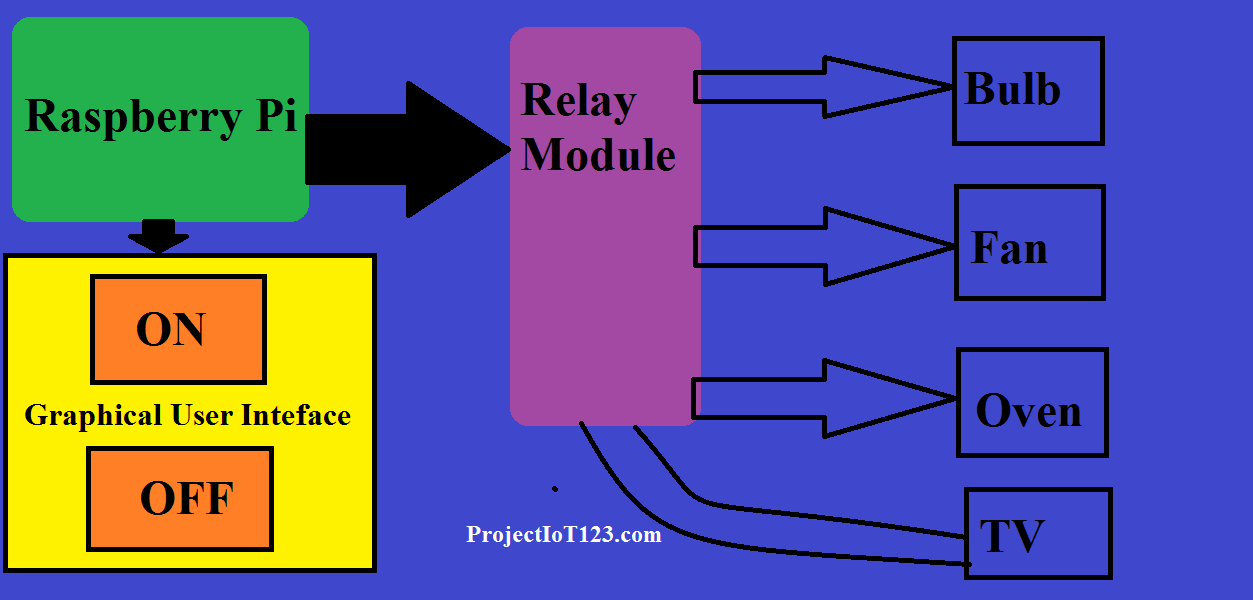 As can be seen in the above picture that the GUI has the buttons for turning on and turning off the home appliances. The Raspberry Pi is connected to the Relay Module via its GPIO pins so when the state of the Raspberry Pi General Purpose Input / Output is changed the state of the Relay module will change which in turn on and off the home appliances. The home appliances will be connected to the Relay Module.
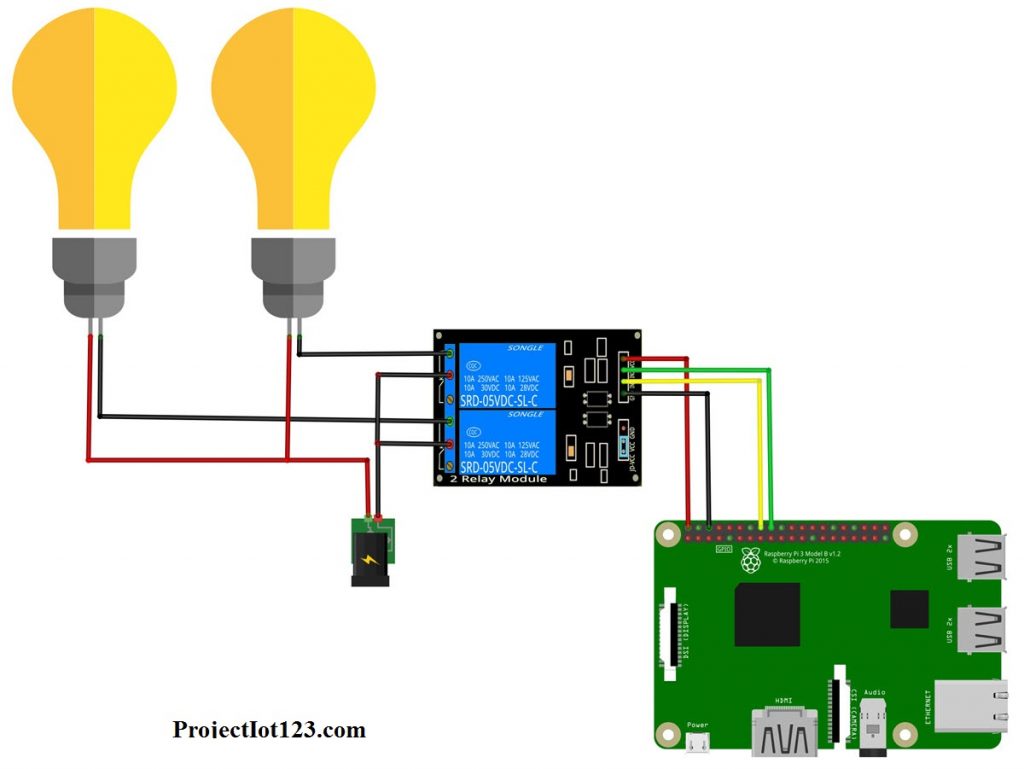
Circuit Diagram:
The circuit diagram of the whole setup is shown in the picture below:
Notice that the inputs of the relay module are connected to the General Purpose Input / Output pins of the Raspberry Pi and the relay module in turn is connected to the bulbs. The female connector shown is for the 12V power supply.
 Python Raspberry Pi Graphical User Interface Code:
Let us now see how to write the code for Graphical User Interface in the Raspberry Pi to control the home appliances.
Step1:
First of all open the Python IDLE.
[otw_is sidebar=otw-sidebar-2]
Step2:
Now you can copy and paste the code given below:
from tkinter import *
import RPi.GPIO as GPIO
GPIO.setmode(GPIO.BOARD)
GPIO.setup(7,GPIO.OUT)
GPIO.setup(8,GPIO.OUT)
GPIO.setup(9,GPIO.OUT)
GPIO.setup(10,GPIO.OUT)
window = tk()
window.title(‘Raspberry GUI Home Automation System’)
window.geometry(‘800x500’)

def relay1_on():
GPIO.output(7,True)
relay1_status.configure(text = ‘ON’)
button_relay1.configure(command = relay1_off)

def relay1_off():
GPIO.output(7,Flase)
relay1_status.configure(text = ‘OFF’)
button_relay1.configure(command = relay1_on)

def relay2_on():
GPIO.output(8,True)
relay2_status.configure(text = ‘ON’)
button_relay2.configure(command = relay2_off)

def relay2_off():
GPIO.output(8,Flase)
Relay2_status.configure(text = ‘OFF’)
button_relay2.configure(command = relay2_on)

def relay3_on():
GPIO.output(9,True)
relay3_status.configure(text = ‘ON’)
button_relay3.configure(command = relay3_off)

def relay3_off():
GPIO.output(9,Flase)
relay3_status.configure(text = ‘OFF’)
button_relay3.configure(command = relay3_on)

def relay4_on():
GPIO.output(10,True)
Relay4_status.configure(text = ‘ON’)
button_relay4.configure(command = relay4_off)

def relay4_off():
GPIO.output(10,Flase)
relay4_status.configure(text = ‘OFF’)
button_relay4.configure(command = relay4_on)

def cleanup():
GPIO.output(7,Flase)

GPIO.output(8,Flase)
GPIO.output(9,Flase)
GPIO.output(10,Flase)

relay1_status = Label(window, relief =’flat’, width = 4)
relay2_status = Label(window, relief =’flat’, width = 4)
relay3_status = Label(window, relief =’flat’, width = 4)
relay4_status = Label(window, relief =’flat’, width = 4)

button_relay1 = Button(window)
button_relay2 = Button(window)
button_relay3 = Button(window)
button_relay4 = Button(window)

button_relay1.configure(text='RELAY1',command=relay1_on)
button_relay2.configure(text='RELAY2',command=relay2_on)
button_relay3.configure(text='RELAY3',command=relay3_on)
button_relay4.configure(text='RELAY4',command=relay4_on)

relay1_status.configure(text='OFF')
relay2_status.configure(text='OFF')
relay3_status.configure(text='OFF')
relay4_status.configure(text='OFF')

button_relay1.grid(row=1,column=1,columnspan=1)
red_led_relay1.grid(row=1,column=2,padx=10)

button_relay2.grid(row=1,column=1,columnspan=1)
red_led_relay2.grid(row=1,column=2,padx=10)

button_relay3.grid(row=1,column=1,columnspan=1)
red_led_relay3.grid(row=1,column=2,padx=10)

button_relay4.grid(row=1,column=1,columnspan=1)
red_led_relay4.grid(row=1,column=2,padx=10)


atexit.register(cleanup)
window.mainloop()
That is all for now I hope this article”Raspberry Pi GUI Based Home Automation Using Python” would be helpful for you, in the next post I will come up with other important applications of the Raspberry Pi till then stay connected, keep reading and enjoy learning.
we will learn raspberry pi simple gui based home automation using python. this is simple gui for home automation using python language
wont work for me, ubuntu raspberrypi3. error with the import Tkinder
trendilyna.com: Building bridges between your brand and your audience through web development.