

ESP8266 Web Server for Beginners 11
[otw_is sidebar=otw-sidebar-1]This article is about ESP8266 web server with simple coding and circuit diagram. A simple and step by step guidance to create an independent ESP8266 web server that can control two or more outputs (two or more LEDs). We are using ESP8266 NodeMCU Server. It is so much flexible that you control it with your mobile, laptop and PC connect with local network.Further we recommended reading Review about ESP8266
Installation Esp8266 in Arduino
In this article we are creating a web server that can control four outputs using Arduino IDE. You can this method in several others project as per your need.
Installation of ESP8266
Generate code and Design Circuit Board ––ESP8266 Web Server
Step1
If you have an old version of Arduino, then you should install it again because may be some old version does not work. Install Arduino IDE you can install or update you IDE software from this link.
Step2
Then you need ESP8266 Add-on using Arduino IDE. Follow this simple procedure.
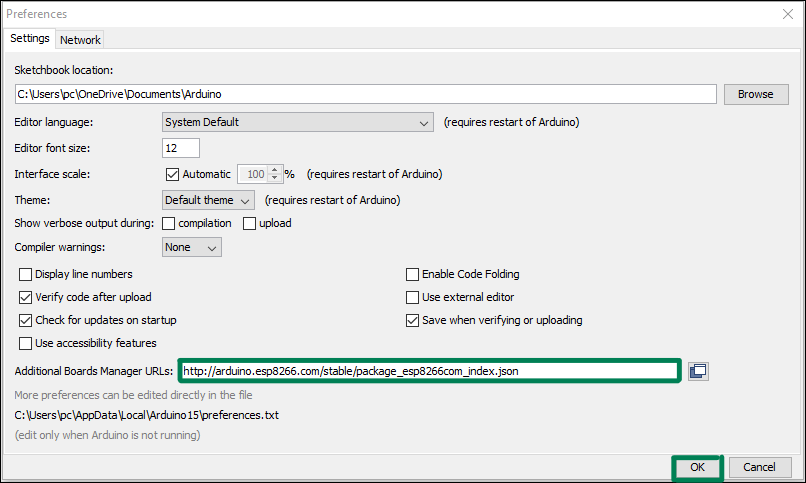
- Click New Ü Preferences
- Enter http://arduino.esp8266.com/stable/package_esp8266com_index.json “Additional Boards Manager URLs” as shown in figure. And Click “OK”.
3.Open the Boards Manager. Go toTools Ü Board Ü Boards Manager.
- Type ESP8266 and press install button by the “ESP8266 by ESP8266 Community “

Your ESP8266 development board is installed. Now let’s do some practical work. Choose the right board and select the port by clicking Tool ÜBoard Manager Üchoose the right board by scrolling it down.
Coding
Copy the given code in the Arduino IDE and make some changes before uploading it. You need to change the code of two variables in quotation mark with your Wi-Fi credentials so that it connects with your router.
Type your Wi-Fi router name and password in these two variables.
Uploading
After coping the code and modifying it with your network credentials, the next step is to select the right board with right port number and plug it with your system. We are using ESP8266-12E NodeMCU Kit.
then click on “upload button”.
This process takes few seconds after that “done uploading” message will be shown on your Arduino IDE screen.

Design Circuit Diagram
To design the circuit diagram you need following items
- ESP8266 Wi-Fi Development board –– ESP826 612-E NodeMCU Kit
- Breadboard
- Jump wires
- Ohms Resistors 4x
- LEDs 4x
ESP8266 Web Server
Four LEDs are connected first with GPIO 5(D1), second with GPIO4(D2), third with GPIO2(D4) and fourth one with GPIO3(RX)
Web Server Testing
After design the circuit board, upload the code and it will work. Choose the right board and COM port carefully otherwise it shows some error.
Now click on serial monitor in the top left corner on the screen. It opens with by default baud rate 115200.
The next step is to press reset button on ESP8266 and you will get an output IP address on your serial monitor as shown in the figure.
Copy this IP address and access the web server by pasting it on search. Now you can turn off and on by just one click.
This is web server of ESP8266 and all the 4 GPIOs can be shown on the web server. If you see at the serial monitor – that HTTP receives a new client request from your Web server. This HTTP request contain other information like header file, which defines the operating parameters.
As you can see currently it is in OFF mode and receive no request when we click on theGPIO5 ON button it receives a new request from client that is your web server.
After receiving a request LED turns on and the status is update too. Now you can test other GPIOs and it will work as it is.
Next turn on led by click on GPIO button. It lights up the led that you want to turn on. While in the background you can clearly see that it receives a request from a new client and turn on the led.
Back to web server status is updated from “state off” to “State on”
Test other GPIOs with the same procedure.
What is happening in the Background?
Now its time to learn how it works. A brief explantion of what is hapining in the background. After that you can update it by your own chioce.
First of all we include ESP8266WiFi library.
The second part contain your SSID and Password as stated earlier.
The next is to set the port number
This statement creates the variables that store the header HTTP request.
After that create four auxiliary variables and it will store state of your outputs from new clients.
Now assign output variables to GPIO pins. You can change GPIOs as you wish. There are two ways whether you assign GPIO’s number or with D’s number.
Now let’s start the real processing. We enter into the setup. And then start the serial communication at baud rate 115200.
Then in next statement defines output GPIOs and set these four GPIOS at low rate.
Now it’s time for IP address and Wi-Fi connection. this statement will print IP address so that you can access you web server.
MQTT Protocol
If a new client sends a request then this part will work. It revives the message from the client from this statement.
This loop continues its process until the client stay connect on web server.
Then we use IF ELSE statement. Any changing in this part might leads to any error or your project does not work properly (Changing not recommended).
[otw_is sidebar=otw-sidebar-3]
I am doing Projects ESP32 and MAX30100 on Proteus. But I can’t get Proteus Library files for both ESP32-WROOM-32 and MAX30100. Could you help me, please?
Wow, awesome weblog layout! How long have you been running a blog for?
you made running a blog look easy. The whole glance of your website is
wonderful, as well as the content! You can see similar here ecommerce
Hi there! Do you know if they make any plugins to assist with SEO?
I’m trying to get my blog to rank for some targeted keywords but I’m not seeing very good
gains. If you know of any please share. Cheers! You can read similar blog here: Sklep online
Very shortly this website will be famous among all blogging and site-building viewers, due to it’s pleasant articles
my page – vpn special coupon
I know this if off topic but I’m looking into starting my own blog and was
wondering what all is required to get setup? I’m assuming having a blog like yours would cost a pretty penny?
I’m not very internet smart so I’m not 100% certain. Any tips or advice
would be greatly appreciated. Many thanks
Review my web page … vpn special coupon
Hi there, everything is going fine here and ofcourse
every one is sharing information, that’s genuinely good, keep up writing.
Here is my page; vpn coupon 2024
Howdy! Do you know if they make any plugins to help with Search Engine Optimization? I’m trying to get my site to rank for some targeted
keywords but I’m not seeing very good gains. If you know
of any please share. Appreciate it! You can read similar article here:
Scrapebox AA List
Write more, thats all I have to say. Literally, it seems as though you relied on the
video to make your point. You obviously know what youre talking
about, why waste your intelligence on just posting videos to your
weblog when you could be giving us something informative to read?
Also visit my web site … vpn 2024
Hi! Do you know if they make any plugins to assist with
Search Engine Optimization? I’m trying to get my website to rank for some targeted keywords but
I’m not seeing very good gains. If you know of any please share.
Thank you! I saw similar art here: GSA Verified List
Dummy Vapes presents a range of flavorful e-liquids crafted for discerning vapers. From fruity blends to decadent desserts, each bottle promises a satisfying vaping experience with premium ingredients and bold tastes.
I’m really inspired with your writing talents
and also with the structure for your weblog.
Is that this a paid topic or did you modify it your self?
Anyway stay up the nice high quality writing, it’s uncommon to peer a nice
blog like this one today..
Also visit my page … vpn coupon 2024