NTP Server to get Date and Time ESP8266 NodeMCU 1
 Use of NTP Server to get Date and Time -ESP8266 NodeMCU
This project “esp8266 ntp clock” is very basic and useful. In this topic you can learn how to get exact time and date. For this I use Real Time Clock (RTC) chip in my project. Used these chips caused problem and I have to set them manually again and again to keep these chips synchronized.
The solution of this problem is to use Network Time Protocol (NTP)
What is Network Time Protocol?
I personally amazed by this protocol, when it comes to synchronizing the project. NTP is famous protocol use to synchronized computer clocks across data network. It was originally developed by D.L Mils at University of Delaware in 1980s and now is on version four. NTP is used to maintain or synchronized the correct time in internet-connected wall and desk clocks within a few milliseconds to Coordinate Universal Time (UTC).
What is UTC?
Coordinate Universal Time (UTC) is the time of your computer. It is the time we live in and the result of a decades-long process of invention. Infect UTC is time standard not a time zone therefore it is same all over the world. NTP does not recognize time zone, based on UTC it manages all the information.
NTP Construction
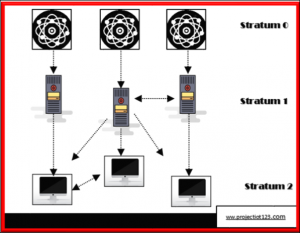
NTP follow hierarchical structure. And each level in the structure is called the stratum.
- In the first level there are devices such as radio clock, atomic clocks. This level is called stratum 0.
- Next level is called Stratum 1 and it is connected to stratum 0’s hardware clock and it give very accurate time.
- And after that each stratum synchronize to the above stratum along with as server for lower stratum computers.
How does it work?
There are number of ways we can operate NTP. And the most common for operating it is to operate in client-server mode. Following are the steps on how to operate it.
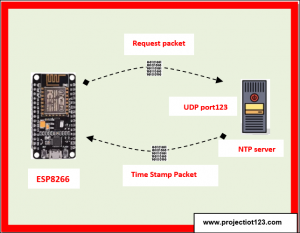
- On port 123 connects the client device buy sing User Datagram Protocol (UDP)
- After that packet to NTP server is been transmitted by client.
- Then NTP server sends time stamp packet in response.
- Actually, time stamps pocket contains multiple information like time zone, accuracy and many more.
- At last client pass out current date and time.
Installing Arduino IDE
Now come to practical part. In this I’ll teach you how to prepare Arduino. For this you should have the ESP8266 and it should be installed in your Arduino. If you don’t have then visit this blog Article about ESP8266 web server.
Installing NTP Client Libraries
To get date and time from a server we Insatll NTP Client Liabraries. Follow the below steps and install it in your Arduino.
- Got to sketch>>include libraries>>manage libraries.
- Now type for “NTPClient” in the search bar by Fabric Weinberg. Then click on install.
Coding
Copy the given code in the Arduino IDE and make some changes before uploading it.
Code…………………………………
 You need to modify the code of two variables in quotation mark with your Wi-Fi credentials so that it connects with your router.
- Next adjust the UTC according to your time zone. Here is list of UTC time offset.
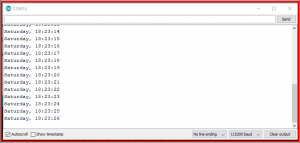
- Next upload the code and make sure that to select the right board and COM port. In this project I use ESP8266 development board. Then in the serial monitor you can see that it shows current date and time like this.
How code works?
now I’ll give a short review about how this code works esp8266 ntp clock .
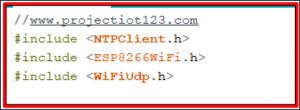
Libraries:
- h is used for synchronize NTP server.
- h is to call to connect to the network providing ESP8266 specific.
- h library controls UDP protocol like sending or receiving and opening UDP port.
Address of NTP client:
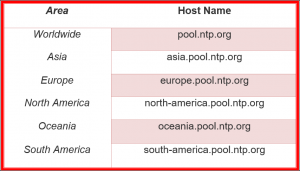
In this step we initialize NTP server address and we use pool.ntp.org. It is an open NTP server. It automatically picks time server for you by geographically. Instead if you want to use explicitly in this project use the given sub-zones.![]()
| Area | Host Name |
| Worldwide | pool.ntp.org |
| Asia | asia.pool.ntp.org |
| Europe | europe.pool.ntp.org |
| North America | north-america.pool.ntp.org |
| Oceania | oceania.pool.ntp.org |
| South America | south-america.pool.ntp.org |
- After the ESP8266 board is connected then we initialize client using function.
- we call update () function so that we can get time and date whenever we want.it transfer the request to NTP server and pass time stamp packet by using UDP protocol into readable format.
- At last day and time can be accessed by NTP client functions.
esp8266 ntp clock
If you enjoyed this article please consider it sharing. I hope it helped you in your project. Keep visiting this website www.projectiot123.com for further information about home automation project. I’ll share other latest projects in the future and if you have any issue related to this project then let me know in the comment section. Ill surely solve your problem. Thank you!
nodemcu esp8266 library for proteus
NTP Server to get Date and Time ESP8266 NodeMCU





Online medicine order http://indiaph24.store/# india pharmacy mail order
top 10 online pharmacy in india