
Arduino interface with I2C and multiple LCD
Arduino interface with I2C and multiple LCD
In this article we will learn how to interface arduino with I2C & multiple LCD in proteus.
In the last post we will learn how to interface arduino with I2C & LCD in proteus. You can visit our website,
I hope you appreciate my work, let’s discuss about today’s project.
Components which we use in this project are listed below
- Arduino nano
- Virtual terminal
- I2C (4)
- LCD 16×2 (4)
- Jumper wires
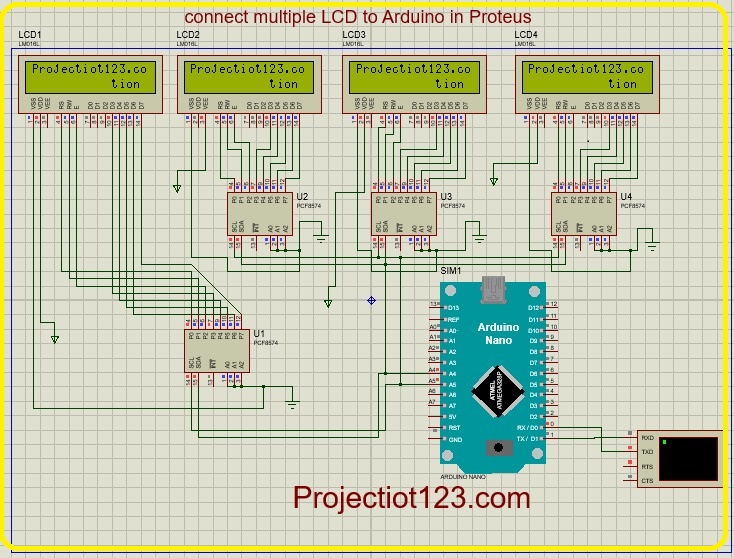
Diagram of this project is below:

Construction of arduino interface with I2C & multiple LCD in Proteus
-
I2C (1)& LCD (1)
- Connect TX point of virtual terminal with the RX point of arduino nano
- Connect the RX point of virtual terminal with the TX point of arduino nano
- Connect A4 pin of arduino with the SDA pin of I2C (1)
- Connect A5 pin of arduino with the SCL pin of the I2C (1)
- Connect A0,A1,A2 points of I2C (1) with the GND
- Connect P0 pin of I2C (1) with the RS point of LCD display(1)
- Connect P1 pin of I2C(1) with the RW point of LCD display (1)
- Connect P2 pin of I2C (1) with the E point of LCD display (1)
- Connect P3 pin of I2C (1) with the D3 point of LCD display (1)
- Connect the P4 pin of I2C (1) with the D4 point of LCD display (1)
- Connect the P5 pin of I2C (1) with the D5 point of LCD display (1)
- Connect the P6 pin of I2C (1) with the D6 point of LCD display (1)
- Connect the P7 pin of I2C (1) with the D7 point of LCD display (1)
- Connect VSS point of LCD (1) with the GND point of I2C (1)
- Connect the VDD point of LCD (1) with the GND
-
I2C (2) & LCD (2)
- Connect A0,A1,A2 points of I2C (2) with the GND
- Connect P0 pin of I2C (2) with the RS point of LCD display(2)
- Connect P1 pin of I2C(2) with the RW point of LCD display (2)
- Connect P2 pin of I2C (2) with the E point of LCD display (2)
- Connect P3 pin of I2C (2) with the D3 point of LCD display (2)
- Connect the P4 pin of I2C (2) with the D4 point of LCD display (2)
- Connect the P5 pin of I2C (2) with the D5 point of LCD display (2)
- Connect the P6 pin of I2C (2) with the D6 point of LCD display (2)
- Connect the P7 pin of I2C (2) with the D7 point of LCD display (2)
- Connect VSS point of LCD (2) with the GND point of I2C (2)
- Connect VEE point of LCD (2) with the GND point
- Connect SCL point of I2C (2) with the points of SCL of both I2C (3,4) through A5 pin of arduino
- Connect the SDA point of I2C (2) with the points of SDA of both I2C (3,4) through A4 pin of arduino
-
I2C (3) & LCD (3)
- Connect A0,A1,A2 points of I2C (3) with the GND
- Connect P0 pin of I2C (3) with the RS point of LCD display(3)
- Connect P1 pin of I2C(3) with the RW point of LCD display (3)
- Connect P2 pin of I2C (3) with the E point of LCD display (3)
- Connect P3 pin of I2C (3) with the D3 point of LCD display (3)
- Connect the P4 pin of I2C (3) with the D4 point of LCD display (3)
- Connect the P5 pin of I2C (3) with the D5 point of LCD display (3)
- Connect the P6 pin of I2C (3) with the D6 point of LCD display (3)
- Connect the P7 pin of I2C (3) with the D7 point of LCD display (3)
- Connect VSS point of LCD (3) with the GND point of I2C (3)
- Connect VDD point of LCD (3) with the GND point
-
I2C (4) & LCD (4)
- Connect A0,A1,A2 points of I2C (4) with the GND
- Connect P0 pin of I2C (4) with the RS point of LCD display(4)
- Connect P1 pin of I2C(4) with the RW point of LCD display (4)
- Connect P2 pin of I2C (4) with the E point of LCD display (4)
- Connect P3 pin of I2C (4) with the D3 point of LCD display (4)
- Connect the P4 pin of I2C (4) with the D4 point of LCD display (4)
- Connect the P5 pin of I2C (4) with the D5 point of LCD display (4)
- Connect the P6 pin of I2C (4) with the D6 point of LCD display (4)
- Connect the P7 pin of I2C (4) with the D7 point of LCD display (4)
- Connect VSS point of LCD (4) with the GND point of I2C (4)
- Connect VDD point of LCD (4) with the GND point
Working of arduino interface with I2C & multiple LCD in Proteus:
Using an Arduino with I2C and multiple LCD displays involves connecting the displays to the Arduino using the I2C communication protocol.
I2C (Inter-Integrated Circuit) is a popular serial communication protocol that allows you to connect multiple devices (in this case, LCD displays) to a single Arduino using only two wires:
Applications of arduino interface with I2C & multiple LCD in Proteus:
- Robotics
- Information Displays
- Industrial Automation
- Home Automation
Advantages of arduino interface with I2C & multiple LCD in Proteus:
- Simplified Wiring
- Addressable Devices
- Reduced Interference
- Scalability
Program code of this project is below:
#include <Wire.h>
#include <LiquidCrystal_I2C.h>
// Set the LCD address to 0x27 for a 16 chars and 2 line display
LiquidCrystal_I2C lcd(0x20, 16, 2);
LiquidCrystal_I2C lcd2(0x22, 16, 2);
LiquidCrystal_I2C lcd3(0x23, 16, 2);
LiquidCrystal_I2C lcd4(0x24, 16, 2);
void setup()
{
// initialize the LCD
lcd.begin();
lcd2.begin();
lcd3.begin();
lcd4.begin();
// Turn on the blacklight and print a message.
lcd.backlight();
lcd2.backlight();
lcd3.backlight();
lcd4.backlight();
lcd.print(“Hello, world!”);
delay(1500);
lcd.clear();
lcd2.print(“Hello, world!”);
delay(1500);
lcd.clear();
lcd3.print(“Hello, world!”);
delay(1500);
lcd.clear();
lcd4.print(“Hello, world!”);
delay(1500);
lcd.clear();
}
void loop()
{
lcd.setCursor(0, 0);
lcd.print(“Projectiot123.co”);
lcd.setCursor(0, 1);
lcd.print(” Micro solution “);
delay(500);
lcd.setCursor(0, 1);
lcd.print(” “);
delay(500);
// Do nothing here…
}