
Arduino interface with RFID simulation & LCD in proteus
Arduino interface with RFID simulation & LCD in proteus
In this article we will learn how to interface arduino with RFID simulation & LCD in proteus.
In the last post we will learn how to interface arduino with servo motor using MIT app. You can visit our website,
I hope you appreciate my work, let’s discuss about today’s project.
Components which we use in this project are listed below:
- Arduino nano
- LCD 16×2
- I2C bus
- LED
- Resistor 220K
- Virtual terminal (2)
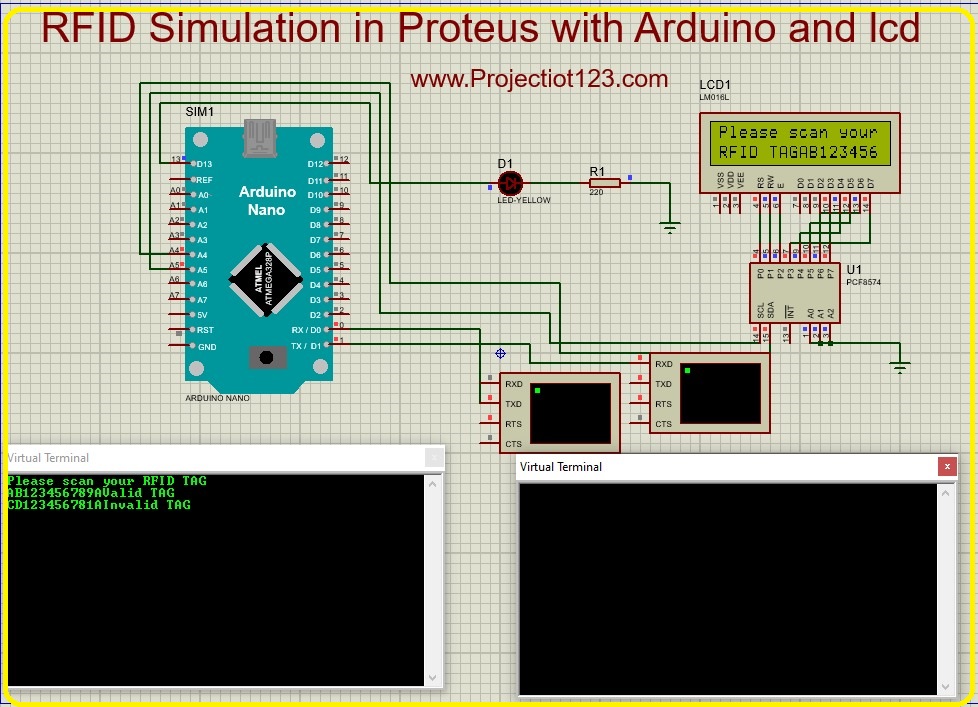
Diagram of this project is listed below:
Construction of arduino interface with RFID simulation & LCD in proteus
- Connect the point RX of arduino to the point TX of virtual terminal
- Connect the TX point of arduino to the point RX of virtual terminal
- Connect the A5 point of arduino to the point 14 of I2C bus
- Connect the A4 point of arduino to the point 15 of I2C bus
- Connect the D13 point of arduino to the +ve side of LED
- Connect the –ve side of LED to the R220
- Connect the other side of R220 to GND
- Connect A0,A1,A2 points of I2C bus to the GND
- Connect the P0 point of I2C bus to the RS point of LCD
- Connect the P1 point of I2C bus to the RW point of LCD
- Connect the P2 point of I2C bus to the E point of LCD
- Connect the P3 point of I2C bus to the D7 point of LCD
- Connect the P4 point of I2C bus to the D4 point of LCD
- Connect the P5 point of I2C bus to the D5 point of LCD
- Connect the P6 point of I2C bus to the D6 point of LCD
- Connect the P7 point of I2C bus to theD3 point of LCD
Working of Arduino interface with RFID simulation & LCD in proteus
Arduino can interface with RFID (Radio-Frequency Identification) modules and LCD to create a project that reads RFID tags and displays information on an LCD screen.
Applications of Arduino interface with RFID simulation & LCD in proteus
- Access control system
- Attendance tracking
- Library management
- Smart home security
Advantages of Arduino interface with RFID simulation & LCD in proteus
- Ease of Use
- Cost-Effective
- Real-time Information
- Security
Program code of this project is below:
#include <Wire.h>
#include <LiquidCrystal_I2C.h>
LiquidCrystal_I2C lcd(0x20, 16, 2);
int count = 0;
char c;
String id;
void setup() {
lcd.begin();
lcd.backlight();
lcd.setCursor(0, 0);
lcd.print(“Please scan your”);
lcd.setCursor(0, 1);
lcd.print(“RFID TAG”);
delay(1500);
Serial.begin(9600);
pinMode(13, OUTPUT);
Serial.println(“Please scan your RFID TAG”);
}
void loop() {
while(Serial.available()>0)
{
c = Serial.read();
count++;
id += c;
if(count == 12)
{
Serial.print(id);
lcd.print(id);
//break;
if(id==”AB123456789A”)
{
Serial.println(” Valid TAG”);
lcd.println(” Valid TAG”);
digitalWrite(13, HIGH);
}
else
{
digitalWrite(13, LOW);
Serial.println(” Invalid TAG”);
lcd.println(” Invalid TAG”);
}
}
}
count = 0;
id=””;
delay(500);
}