Arduino interface with automatically IN and out door sensors in proteus
Arduino interface with automatically IN and out door sensors in proteus
In this article we will learn how to interface arduino with Automatically IN and Out Sensors in proteus.
In the last post we will learn how to interface arduino with IR, GAS, Temperature sensors and I2C display for Home security in proteus. You can visit our website,
I hope you appreciate my work, let’s discuss about today’s project.
Components which we use in this project are listed below:
- Arduino UNO
- LCD display
- IN sensor
- Out sensor
- LEDs
- Servo motors
- Jumping wires
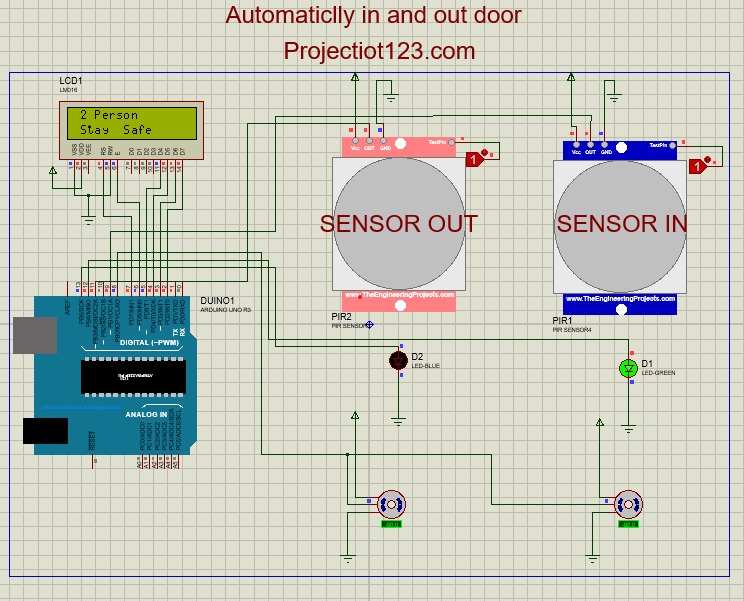
Diagram of this project is below:

Construction of arduino interface with automatically IN and out door sensors in proteus:
- Connect the +ve point of LED1 with the pin 12 of Arduino
- Connect the –ve side of LED1 with the GND
- Connect the +ve point of LED2 with the pin 13 of Arduino
- Connect the –ve point of LED2 with the GND
- Connect the +ve pin of servo motor 1&2 with the +ve
- Connect the –ve pin of servo motor 1&2 with the GND
- Connect the signal pins of servo motor 1&2 common with the pin 8 of Arduino
- Connect the GND pin of IN sensor with the GND
- Connect the VCC pin of IN sensor with the +ve
- Connect the OUT pin of IN sensor with the pin 9 of Arduino
- Connect the GND pin of Out sensor with the GND
- Connect the VCC pin of Out sensor with the +ve
- Connect the OUT pin of Out sensor with the pin 10 of Arduino
- Connect the VDD pin of LCD display with the +ve
- Connect the VSS & RW pin of LCD display with the GND
- Connect the RS pin of LCD display with the pin 7 of Arduino
- Connect the E pin of LCD display with the pin 6 of Arduino
- Connect the D4 pin of LCD display with the pin 5 of Arduino
- Connect the D5 pin of LCD display with the pin 4 of Arduino
- Connect the D6 pin of LCD display with the pin 3 of Arduino
- Connect the D7 pin of LCD display with the pin 2 of Arduino
Working of arduino interface with automatically IN and outdoor sensors in proteus:
An Arduino can be used to interface with indoor and outdoor sensors to collect data and perform various tasks based on the sensor inputs. The specific sensors and applications can vary widely. When someone come close to this sensor it will be open the door automatically and when someone want to exit it should come in the range of sensor when it will, the sensor automatically open the door
Applications of arduino interface with automatically IN and outdoor sensors in proteus:
- Shopping malls
- Banks
- Cinemas
- Hospitals
- Home Automations
Advantages of arduino interface with automatically IN and outdoor sensors in proteus:
- Cost-Effective
- Customization
- Flexibility
- Accessibility
- User-Friendly Programming
Program code of this project is below:
#include <LiquidCrystal.h>
LiquidCrystal lcd(7, 6, 5, 4, 3, 2);
#include <Servo.h>
Servo rservo;
int a=0;
int b=0;
int c=9;
int d=0;
int e=11;
int f=0;
void setup()
{
lcd.begin(16, 2);
Serial.begin(9600);
rservo.attach(8);
pinMode(13, OUTPUT);
pinMode(9, INPUT);
pinMode(12, OUTPUT);
pinMode(11, INPUT);
}
void loop()
{
d=digitalRead(c);
f=digitalRead(e);
if(d==1)
{
f==0;
delay(2000);
}
else if(f==1)
{
d==0;
delay(2000);
}
if(a==0)
{
lcd.setCursor(1,0);
lcd.print(“0 Person”);
rservo.write(0);
a=1;
b=0;
}
else if((d==1)&&(a==1))
{
lcd.setCursor(1,0);
lcd.print(“1 Person”);
rservo.write(45);
delay(2500);
rservo.write(0);
digitalWrite(12, HIGH);
delay(1000);
digitalWrite(12, LOW);
a=2;
b=4;
}
else if((d==1)&&(a==2))
{
lcd.setCursor(1,0);
lcd.print(“2 Person”);
rservo.write(45);
delay(2500);
rservo.write(0);
digitalWrite(12, HIGH);
delay(1000);
digitalWrite(12, LOW);
a=3;
b=3;
}
else if((d==1)&&(a==3))
{
lcd.setCursor(1,0);
lcd.print(“3 Person”);
rservo.write(45);
delay(2500);
rservo.write(0);
digitalWrite(12, HIGH);
delay(1000);
digitalWrite(12, LOW);
a=4;
b=2;
}
else if((d==1)&&(a==4))
{
lcd.setCursor(1,0);
lcd.print(“4 Person”);
rservo.write(45);
delay(2500);
rservo.write(0);
digitalWrite(12, HIGH);
delay(1000);
digitalWrite(12, LOW);
a=5;
b=1;
}
else if((d==1)&&(a==5))
{
digitalWrite(12, HIGH);
delay(1000);
digitalWrite(12, LOW);
lcd.setCursor(1,0);
lcd.print(“5 Person”);
delay(2500);
rservo.write(45);
delay(2500);
rservo.write(0);
lcd.setCursor(1,0);
a=6;
b=0;
}
else if((d==1)&&(a==6))
{
rservo.write(0);
lcd.setCursor(1,0);
lcd.print(“Full Capacity”);
delay(2500);
lcd.setCursor(1,0);
lcd.print(” “);
delay(2500);
digitalWrite(12, HIGH);
delay(1000);
digitalWrite(12, LOW);
lcd.print(“Full Capacity”);
delay(2500);
lcd.setCursor(1,0);
lcd.print(” “);
delay(2500);
}
else if((f==1)&&(b==0))
{
lcd.setCursor(1,0);
lcd.print(” “);
lcd.setCursor(1,0);
lcd.print(“4 Person”);
rservo.write(45);
delay(2500);
rservo.write(0);
digitalWrite(13, HIGH);
delay(1000);
digitalWrite(13, LOW);
b=1;
a=4;
}
else if((f==1)&&(b==1))
{
lcd.setCursor(1,0);
lcd.print(“3 Person”);
rservo.write(45);
delay(2500);
rservo.write(0);
digitalWrite(13, HIGH);
delay(1000);
digitalWrite(13, LOW);
b=2;
a=3;
}
else if((f==1)&&(b==2))
{
lcd.setCursor(1,0);
lcd.print(“2 Person”);
rservo.write(45);
delay(2500);
rservo.write(0);
digitalWrite(13, HIGH);
delay(1000);
digitalWrite(13, LOW);
b=3;
a=2;
}
else if((f==1)&&(b==3))
{
lcd.setCursor(1,0);
lcd.print(“1 Person”);
rservo.write(45);
delay(2500);
rservo.write(0);
digitalWrite(13, HIGH);
delay(1000);
digitalWrite(13, LOW);
b=4;
a=1;
}
else if((f==1)&&(b==4))
{
lcd.setCursor(1,0);
lcd.print(“0 Person”);
rservo.write(45);
delay(2500);
rservo.write(0);
digitalWrite(13, HIGH);
delay(1000);
digitalWrite(13, LOW);
b=5;
a=0;
}
else if((f==1)&&(b==5))
{
rservo.write(0);
digitalWrite(13, HIGH);
}
digitalWrite(12, LOW);
digitalWrite(13, LOW);
//Serial.print(a);
//Serial.print(b);
//Serial.print(c);
//Serial.print(d);
//Serial.print(e);
//Serial.print(f);
lcd.setCursor(1,1);
lcd.print(” “);
delay(100);
lcd.setCursor(1,1);
lcd.print(“Limit 5 Person”);
delay(1000);
lcd.setCursor(1,1);
lcd.print(” “);
delay(100);
lcd.setCursor(1,1);
lcd.print(“Stay Home”);
delay(1000);
lcd.setCursor(1,1);
lcd.print(” “);
delay(100);
lcd.setCursor(1,1);
lcd.print(“Stay Safe”);
delay(1000);
}

