
ESP32 ADC Tutorial
ESP32 ADC Tutorial
Hi viewers, today we will learn about ESP2 ADC Tutorial.
In this Article we discuss many headings of ESP32 ADC, like (example, calibration, accuracy, noise, audio, etc)
So let’s dive into:
The ESP32 microcontroller has built-in Analog-to-Digital Converters (ADC) that allow you to read analog signals. Here’s a simple tutorial to get you started with reading analog values using the ADC on the ESP32 using the Arduino IDE.
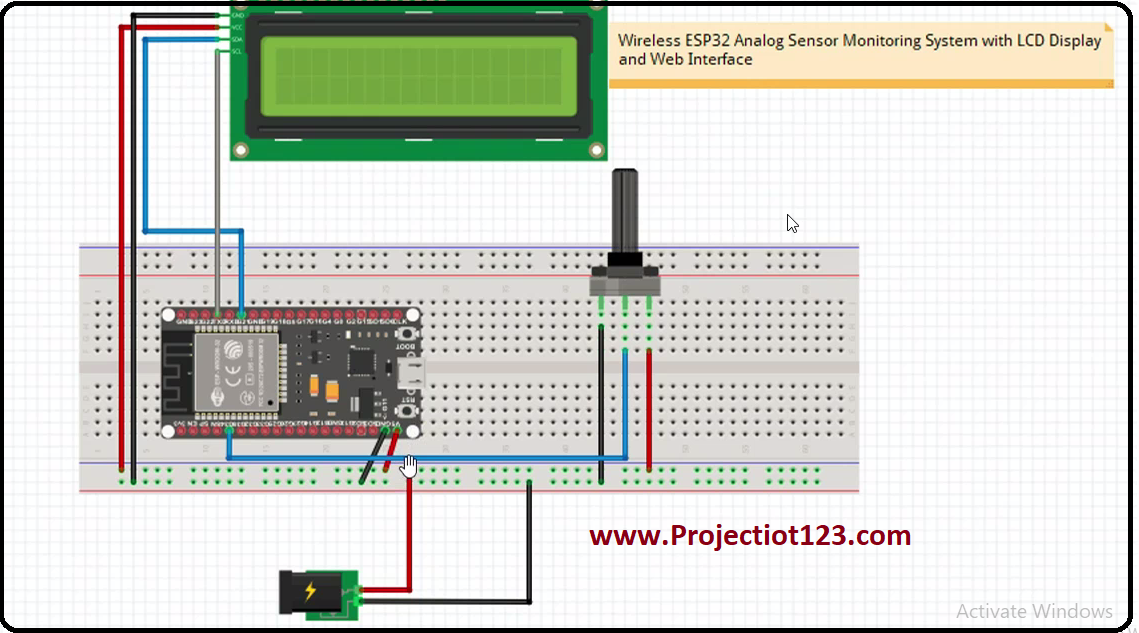
Circuit Diagram:
ESP32 ADC Example:
Make sure you have the ESP32 board support installed in the Arduino IDE, and the correct board selected under Tools > Board. Also, ensure that you have connected a potentiometer or any other analog sensor to the specified ADC pin (in this case, pin 34).
[dt_code]
const int analogInPin = 34; // Define the ADC pin
void setup() {
Serial.begin(115200); // Initialize serial communication
}
void loop() {
int sensorValue = analogRead(analogInPin); // Read analog value from the specified pin
float voltage = sensorValue * (3.3 / 4095.0); // Convert ADC value to voltage (assuming 12-bit resolution)
Serial.print(“ADC Value: “);
Serial.print(sensorValue);
Serial.print(“, Voltage: “);
Serial.println(voltage);
delay(1000); // Wait for a second (adjust as needed)
}
[/dt_code]
This code reads the analog input, converts it to voltage, and prints the ADC value and corresponding voltage to the Serial Monitor. Adjust the pin number and other parameters based on your specific setup.
ESP32 ADC Calibration:
Calibrating an ADC involves compensating for any inaccuracies or variations in the conversion process to ensure accurate readings. Calibration can be particularly important when working with sensors or applications where precise measurements are required.
ESP32 ADC Accuracy:
The accuracy of ADC readings on the ESP32, or any microcontroller, is influenced by various factors. Understanding and addressing these factors can help improve the overall accuracy of analog-to-digital conversions.
ESP32 ADC Noise:
Noise in the context of analog signals refers to unwanted electrical fluctuations or interference that can affect the accuracy of measurements. In the case of ADC readings on the ESP32 or any microcontroller, minimizing noise is crucial for obtaining accurate and reliable results.
ESP32 ADC DMA:
Using DMA (Direct Memory Access) with the ESP32 ADC allows you to efficiently transfer data from the ADC to memory without involving the CPU in every data transfer. This can be beneficial for high-speed or continuous data acquisition applications.
ESP32 ADC Reference Voltage:
The ESP32 ADC uses a reference voltage to convert analog signals into digital values. The default reference voltage is 1.1V. However, the ESP32 provides flexibility in choosing the reference voltage according to your requirements.
ESP32 ADC Sample Rate:
The sampling rate of the ESP32 ADC is dependent on various factors, including the ADC configuration and the ESP32’s clock speed. The ESP32 ADC can be configured with different sampling speeds, and the achievable rate depends on the specific configuration settings.