

Arduino Nano LCD PCB design on proteus
Arduino Nano LCD PCB design on proteus
In this article we will learn how to make Arduino Nano LCD PCB design in proteus.
In the last post we will learn how to make Remote Control Traffic Light in proteus. You can visit our website,
I hope you appreciate my work, let’s discuss about today’s project.
Components :
- Arduino nano
- LCD display
- Resistor variable
- Regulator (7805)
- Capacitor (1000uF)
- Diod (4007)
- Jumper wires
Diagram of this project is below:
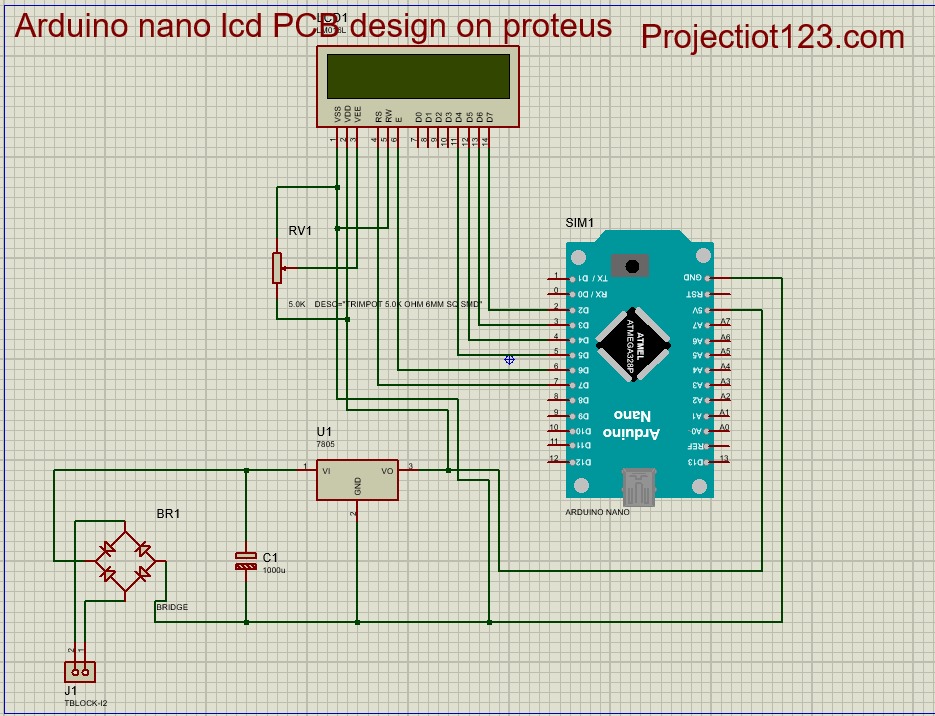
Construction of Arduino Nano LCD PCB design on proteus
- Connect 5v pin of arduino with VO pin of regulator through VDD pin of LCD display
- Connect D2 pin of Arduino with the pin D7 of LCD display
- Connect D3 pin of Arduino with the pin D6 of LCD display
- Connect D4 pin of Arduino with the pin D5 of LCD display
- Connect D5 pin of Arduino with the pin D4 of LCD display
- Connect D6 pin of Arduino with the pin E of LCD display
- Connect D7 pin of Arduino with the pin RS of LCD display
- Connect RW and VSS pin of LCD display with each other and then connect them with GND
- Connect VEE pin of LCD display with signal pin of Resistor variable
- Connect ammeter pin of RV with the connect of VDD pin of LCD display
- Connect collector pin of RV with the connect of VSS pin of LCD display
- Connect GND pin of Arduino with GND
- Connect GND pin of Regulator with GND
- Connect –ve side of capacitor with GND
- Connect –ve sides of Diod 1 and 2 with VI pin of regulator through +ve side of capacitor
- Connect +ve side of diod 1 with –ve side of diod 3
- Connect +ve side of diod 2 with –ve side of diod 4
- Connect +ve sides of diod 3 and 4 with each other and then connect GND at this junction
- Connect one terminal of 12v supply at the junction of diod 2 & 4
- Connect 2nd terminal of 12v supply at the junction of diod 1 & 3
Working of Arduino Nano LCD PCB design on proteus
The Arduino Nano is a popular microcontroller board that can be used for various projects, and you can connect an LCD (Liquid Crystal Display) to it for displaying information or user interfaces
Applications of Arduino Nano LCD PCB design on proteus
- Temperature and Humidity Monitoring
- Digital Thermometer
- Digital Clock
- Weather Station
- Data Logger
Advantages of Arduino Nano LCD PCB design on proteus
- Compact Size
- Customization
- Reduced Wiring
- Enhanced Reliability
- Cost-Effective for Production