
Arduino Interfacing with Speaking Thermometer in Proteus
Arduino Interfacing with Speaking Thermometer in Proteus
In this article we will learn how to Interfacing Arduino with Speaking Thermometer in Proteus.
In the last post we will learn how to make Line Follower Robot Using Arduino in Proteus. You can visit our website,
I hope you appreciate my work, let’s discuss about today’s project.
Components:
- Arduino Uno
- Arduino Audio (MCP4921)
- SD card
- Resistors (1k, 100k,)
- Push Buttons
- LED
- Jumper Wires
What is Speaking Thermometer?
A speaking thermometer is a device that provides temperature readings audibly, typically through a built-in speaker or audio output. It’s designed to assist individuals, especially those with visual impairments, by verbally announcing the temperature readings instead of displaying them visually on a screen or through a traditional display. These thermometers often use voice synthesis technology to convert the temperature readings into speech, making it accessible and easier for users to understand the temperature without relying on visual cues.
Amazon Links:
Working Principles:
Speaking thermometers use technology that converts temperature readings into audible speech.
Here’s a general overview of their working principles:
- Temperature Sensing:
The thermometer contains a temperature sensor that measures the ambient temperature. This sensor could be a thermistor, thermocouple, or other temperature-sensitive devices.
- Data Conversion:
The sensor detects the temperature and converts it into an electrical signal. This analog signal is then converted into digital data that represents the temperature value.
- Voice Synthesis:
The digital data is processed by the device’s microcontroller or processor, which interprets the temperature value and converts it into speech using pre-recorded audio clips or through text-to-speech algorithms.
- Audio Output:
The converted speech is sent to a built-in speaker or an audio output device. This produces audible announcements or readings of the temperature in a clear and understandable manner.
- User Interaction:
Some speaking thermometers allow user interaction, such as selecting temperature units (C° or F°) or enabling additional features through buttons or controls. These interactions are often accompanied by spoken prompts or feedback.
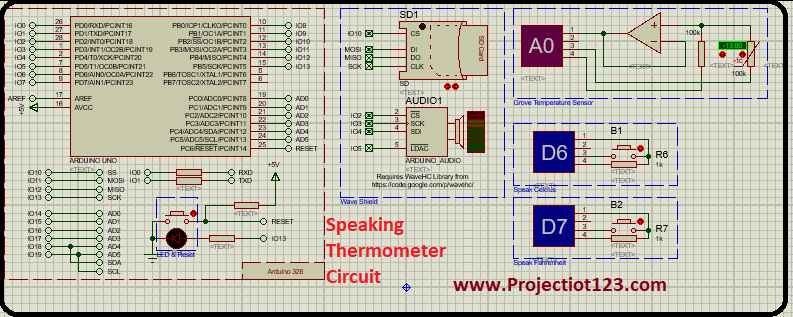
Circuit Connection:
- Connect CS pin of SD card with D10 pin of Arduino
- Connect D1 pin of SD card with D11 pin of Arduino Uno
- Connect D0 pin of SD card with D12 pin of Arduino Uno
- Connect CLK pin of SD card with D13 pin of Arduino Uno
- Connect CS pin of Arduino-Audio with D2 pin of Arduino Uno
- Connect SCK pin of Arduino –Audio with D3 pin of Arduino Uno
- Connect SD pin of Arduino-Audio with D4 pin of Arduino Uno
- Connect pin 5 of Arduino –Audio with D6 pin of Arduino Uno
- Connect pin 1 of C° Groove with the one side of Resistor 1k trough Push button
- Connect 2nd side of Push button with pin 4 of C° Groove
- Connect 2nd side of Push Button with pin of C° Grove
- Connect pin 1 of F° Groove with the one side of Resistor 1k trough Push button
- Connect 2nd side of Push button with pin 4 of F° Groove
- Connect 2nd side of Push Button with pin of F° Grove
Proteus Library:
Here you can download the proteus library for Speaking Thermometer.