
Raspberry based Web Server using Python 9
[otw_is sidebar=otw-sidebar-1]In this post I will discuss the web server based on the Raspberry Pi using the Python IDLE, that is the Raspberry Pi will acts as the web server and give the content saved on it to the client which requests for the data. The Raspberry Pi will serve as the host and the device requesting for the data will act as the client. I will be using the Python IDLE to write the code and text editor in the Raspberry Pi for the template writing of the web using HTML.
[otw_is sidebar=otw-sidebar-2]
Raspberry based Web Server using Python:
After reading this post you will be able to create your own web server and will be able to design it as you desire. This post can be thought as the first part for the Home Automation System based on the Raspberry Pi via Wi Fi. In the next post I will use the web server designed in this post to build the wireless control of the home appliances. That is by connecting to the same network by your phone or laptop to the network to which your Raspberry Pi is connected you can access the web server and manipulate the GPIO pins of the Raspberry Pi. You can either read the state of the GPIO pins or can on off these pins. So in the first part I will discuss about how to create the web server based on the Raspberry Pi using Python and in the next part I will discuss about how to use this web server to build the Home Automation System via Wi Fi.
[otw_is sidebar=otw-sidebar-3]
Raspberry Pi Web Server:
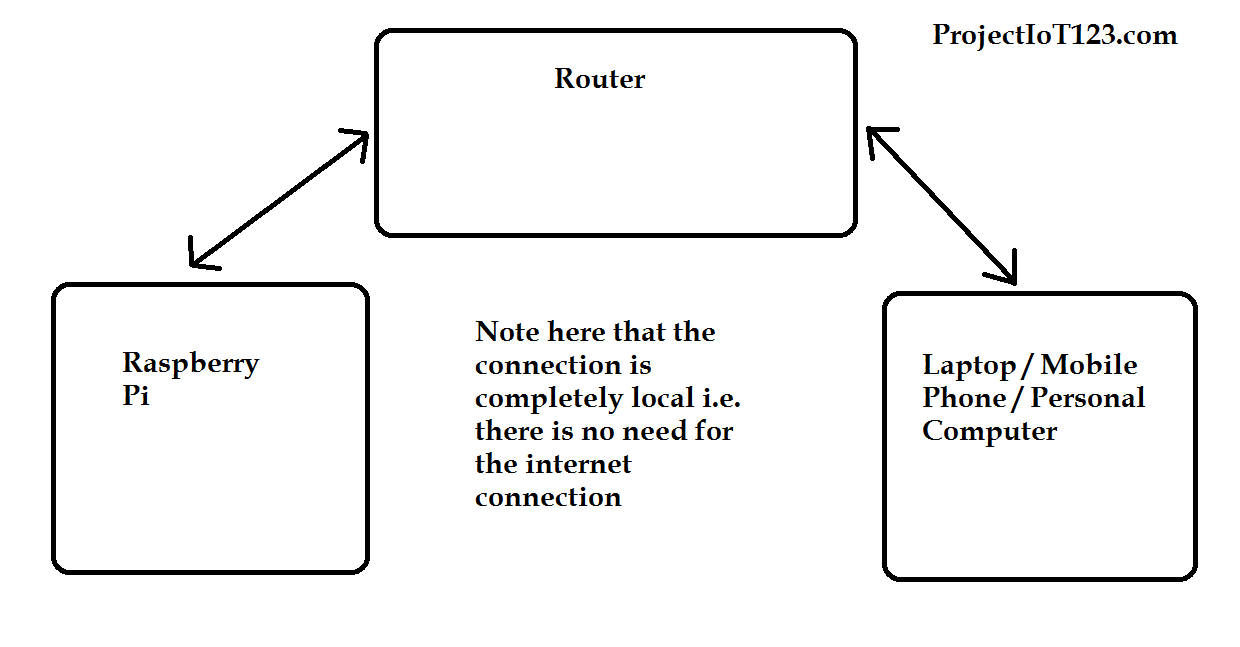
Before diving into the process let us first understand what is the web server and how the Raspberry Pi will act as the web server. A web server is any software or hardware that stores, manage and provide the content to the client on demand. That is when a client demands the information form any website the web server on which this website along with its content is saved gives this information to the client. In this post the raspberry Pi will act as the web server that is we will program the Raspberry Pi in such a way that the web page and the content of the web page is saved on it and can be accessed through the network from the Raspberry Pi. Here it is important to note that you will not need to have the internet connection for this tutorial that is the network is completely local. The Raspberry Pi will be connected to the home network that is to the router using Wi Fi this router will assign a particular IP address to the Raspberry Pi. So in order to access the web server based on this Raspberry Pi connected to your home network you need to connect to this network as there is no internet connection and the web server cannot be accessed over internet but can be accessed through this local network. The idea can be understand with the help of the following block diagram:
I have already discussed about how to connect the Raspberry Pi to local network via Wi Fi in my previous post.
Installing Flask for web server using Python:
In order to create the web server based on the Raspberry Pi using the Python we need to install the micro frame work which is called the Flask. For the simplicity sake the discussion on what the flask is avoided in the post. All we need to know that Flask is important to install if we want to create the web server based on the Raspberry Pi using the Python IDLE. Follow the following simple steps to install the Flask in the Raspberry Pi.
[otw_is sidebar=otw-sidebar-3]
Step1:
First of all open the terminal window in the Raspberry Pi.
Step2:
Now type the following command in the terminal window and then press enter.
sudo apt-get install python3-flask
The installation of flask is this simple. After successfully installing the Flask micro framework proceed to the following steps.
Create the folder:
The next step is to create the folder in the Raspberry Pi. keep in mind as you will see later that there will be more than one file involved in the making of the Raspberry PI based web server, so it is good approach that we create the folder inside the Raspberry Pi and place all the files of our current project in that folder, although it is not necessary but it is a good approach and I recommend you to create the folder.
[otw_is sidebar=otw-sidebar-1]
Step1:
In the terminal window type the following command.
mkdir rpiWebServer
This command will create the folder named WebServer.
Step2:
Make the sub folders in this folder by typing the following command in the terminal window. You will understand its importance when you write the code for HTML template.
cd rpiWebServer
mkdir template
This folder is to keep the HTML file. Now type the following command to make another sub folder.
mkdir static
Python code for Web server:
[otw_is sidebar=otw-sidebar-3]
After you installed the Flask micro framework and made the folders it is now time to create your first very own web server. Follow the following steps to be able to create your Raspberry PI based web server.
Step1:
Open the Python IDLE in the Raspberry Pi.
Step2:
You can copy and paste the following code in your Python IDLE.
from flask import flask
app = Flask(__name__)
@app.route(‘/’)
def index():
deturn ‘Hello World’
df __name__==’’__main__’:
dpp.run(debug=True, port = 80,host = ‘0.0.0.0’)
Notice the Flask micro framework we have imported in the above code.
Step3:
Now save the above file with any name you want. Let us save it as “firstpart.py”. You can run this file from the command window by typing its name in the window. You will see the “Hello World” written in the terminal window.
You can run this file in another way which is more relevant to our task. For this you will need a smart phone or laptop with built in Wi Fi. Connect your mobile phone or your laptop with same network to which your Raspberry Pi is connected. Open any web browser and enter the IP address of your Raspberry Pi in the URL, and you will see the web page with the “hello world” written on it. I hope the working of the Raspberry Pi based web server is self-explanatory now.
That is all for now, in the next post I will discuss about how to use this web server based on the Raspberry Pi to create our own Home Automation System.
Very good and clear tutorial. looking for to the next part.
casibom güncel
En Son Dönemin En Gözde Bahis Platformu: Casibom
Bahis oyunlarını sevenlerin artık duymuş olduğu Casibom, son dönemde adından genellikle söz ettiren bir bahis ve kumarhane sitesi haline geldi. Türkiye’nin en iyi casino sitelerinden biri olarak tanınan Casibom’un haftalık olarak değişen erişim adresi, alanında oldukça yenilikçi olmasına rağmen itimat edilir ve kazandıran bir platform olarak ön plana çıkıyor.
Casibom, muadillerini geride bırakarak uzun soluklu kumarhane sitelerinin geride bırakmayı başarmayı sürdürüyor. Bu alanda köklü olmak gereklidir olsa da, katılımcılarla iletişimde bulunmak ve onlara ulaşmak da aynı derecede önemlidir. Bu noktada, Casibom’un gece gündüz hizmet veren canlı destek ekibi ile kolayca iletişime geçilebilir olması önemli bir fayda getiriyor.
Hızlıca genişleyen oyuncuların kitlesi ile dikkat çekici Casibom’un arka planında başarı faktörleri arasında, sadece ve yalnızca kumarhane ve gerçek zamanlı casino oyunları ile sınırlı olmayan kapsamlı bir hizmetler yelpazesi bulunuyor. Spor bahislerinde sunduğu kapsamlı seçenekler ve yüksek oranlar, katılımcıları ilgisini çekmeyi başarıyor.
Ayrıca, hem spor bahisleri hem de bahis oyunları katılımcılara yönlendirilen sunulan yüksek yüzdeli avantajlı ödüller da dikkat çekiyor. Bu nedenle, Casibom hızla piyasada iyi bir reklam başarısı elde ediyor ve büyük bir katılımcı kitlesi kazanıyor.
Casibom’un kazandıran ödülleri ve popülerliği ile birlikte, platforma üyelik ne şekilde sağlanır sorusuna da değinmek gereklidir. Casibom’a mobil cihazlarınızdan, PC’lerinizden veya tabletlerinizden tarayıcı üzerinden rahatça erişilebilir. Ayrıca, sitenin mobil uyumlu olması da büyük bir fayda sağlıyor, çünkü şimdi hemen hemen herkesin bir cep telefonu var ve bu telefonlar üzerinden hızlıca ulaşım sağlanabiliyor.
Mobil cihazlarınızla bile yolda canlı bahisler alabilir ve yarışmaları canlı olarak izleyebilirsiniz. Ayrıca, Casibom’un mobil cihazlarla uyumlu olması, ülkemizde casino ve oyun gibi yerlerin kanuni olarak kapatılmasıyla birlikte bu tür platformlara erişimin büyük bir yolunu oluşturuyor.
Casibom’un güvenilir bir kumarhane web sitesi olması da önemli bir fayda sunuyor. Lisanslı bir platform olan Casibom, kesintisiz bir şekilde eğlence ve kazanç elde etme imkanı sunar.
Casibom’a kullanıcı olmak da oldukça kolaydır. Herhangi bir belge koşulu olmadan ve ücret ödemeden platforma kolayca kullanıcı olabilirsiniz. Ayrıca, site üzerinde para yatırma ve çekme işlemleri için de birçok farklı yöntem mevcuttur ve herhangi bir kesim ücreti alınmamaktadır.
Ancak, Casibom’un güncel giriş adresini takip etmek de gereklidir. Çünkü canlı iddia ve oyun platformlar moda olduğu için sahte siteler ve dolandırıcılar da ortaya çıkmaktadır. Bu nedenle, Casibom’un sosyal medya hesaplarını ve güncel giriş adresini periyodik olarak kontrol etmek gereklidir.
Sonuç, Casibom hem emin hem de kar getiren bir casino sitesi olarak dikkat çekici. Yüksek ödülleri, geniş oyun seçenekleri ve kullanıcı dostu taşınabilir uygulaması ile Casibom, oyun tutkunları için ideal bir platform sağlar.
buy cheap propecia pill: buying generic propecia without prescription – cheap propecia without insurance
ciprofloxacin generic cipro ciprofloxacin cipro 500mg best prices
https://finasteride.store/# cheap propecia online
https://lisinopril.network/# zestril 20
where can i buy cipro online: ciprofloxacin order online – ciprofloxacin order online
order generic propecia pill generic propecia without rx cost cheap propecia tablets
http://ciprofloxacin.tech/# purchase cipro