

Arduino Temperature and Humidity Controller Leave a comment
[otw_is sidebar=otw-sidebar-1]In this lesson, we will assemble a circuit to interface Arduino with DHT11 Humidity Sensor. One of the important applications of connecting DTH11 sensor with Arduino is to look on weather condition.
Arduino Temperature and Humidity Controller
DHT11 is a part of Humidity sensors. These sensors have many series one is DHT22. Both these sensors are Relative Humidity Sensor. As a result, they will calculate both the humidity and temperature. Even DHT11 Humidity Sensors having low cost but they are famous among the beginners. The DHT11 Humidity and Temperature Sensor consists of 3 major components. A resistive type humidity sensor, an NTC thermistor, it use to calculate the temperature. An 8-bit microcontroller, which transform the analog signals from both of these sensors and sends out single digital signal.
This digital signal can be read by any microprocessor for further examination.
Pin Configuration
| Pin No. | Pin Name | Description |
| 1 | Vcc | Power supply 3.5v -5.5v |
| 2 | Data | Output through serial data |
| 3 | NC | No connection |
| 4 | GND | Ground |
Components Required
Circuit Diagram
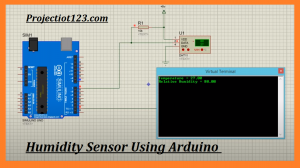
We will take a look on circuit design of Humidity sensor interfacing with Arduino. We have used a device in this project so you require connecting a 10k pull up resistor.
Looking at the design, the data pin of the DHT11 Sensor is attached to the Pin 11 of Arduino. A Virtual Terminal pin RXD is attached to Arduino pin 1 to show the results. DHT11 pin 4 is attached to Arduino pin 4.
 Working

A simple project is constructing by using Arduino and DHT11 Humidity Sensor, where the Humidity are displayed on a virtual terminal.
Even though there is a special library for the DHT11 device known as “DHT”. If you want to use this library, you required to download this library separately and add it to the libraries of Arduino.
The program install in Arduino is based on the data timing given in the datasheet. The program will command the Arduino to automatically read the data from the sensor and shows it as Humidity on the Virtual Display.
Applications
- Heating Ventilation and Air Conditioning Systems
- Weather Stations
- Home Automation
- Environment monitoring
- Medical equipments
Arduino Temperature and Humidity Controller