

Virtual Terminal in proteus 39
 In this post I will discuss about the Virtual Terminal in Proteus. In the previous posts I have discussed the Simulation of some of the commonly used sensors and actuators in embedded systems. While discussing those simulations I have frequently used Virtual terminal to display data coming over the Serial port of Arduino microcontroller. I have not discussed about the Virtual terminal in any of the previous posts in detail so this post will be dedicated to the Virtual Terminal in Proteus. I will demonstrate here about how use the Virtual Terminal and in addition I will also demonstrate the communication using the Virtual Terminal.[otw_is sidebar=otw-sidebar-2]
Virtual Terminal in Proteus
[otw_is sidebar=otw-sidebar-3]
- Virtual Terminal is a very useful tool available in the Proteus. With the help of Virtual Terminal one can easily simulate the serial communication that he / she use in his / her embedded systems.
- It is important to note here that almost every microcontroller that is used in the embedded system has integrated UART (Universal Asynchronous Receiver Transmitter) on it
- which is used to perform serial communication between other hardware used in embedded system that also supports Universal Asynchronous receiving and transmission.
- So while writing the code for serial transmission and designing the circuit it is required that the code and design should be tested for serial communication, so that any problem in the code or communication can be resolved before implementing the circuit physically.
- It should have come in the reader’s mind that how we can see the data transmitted to or from the microcontroller serial port in the software.
- The answer is the Virtual Terminal. Thus the Virtual Terminal plays the role while simulating the embedded systems that compliance the serial communication through the Universal Asynchronous Receiver or Transmitter.
- The Virtual Terminal in the Proteus is bi-directional which means that it can send and receive data simultaneously. The Virtual Terminal looks like the one in the following image:
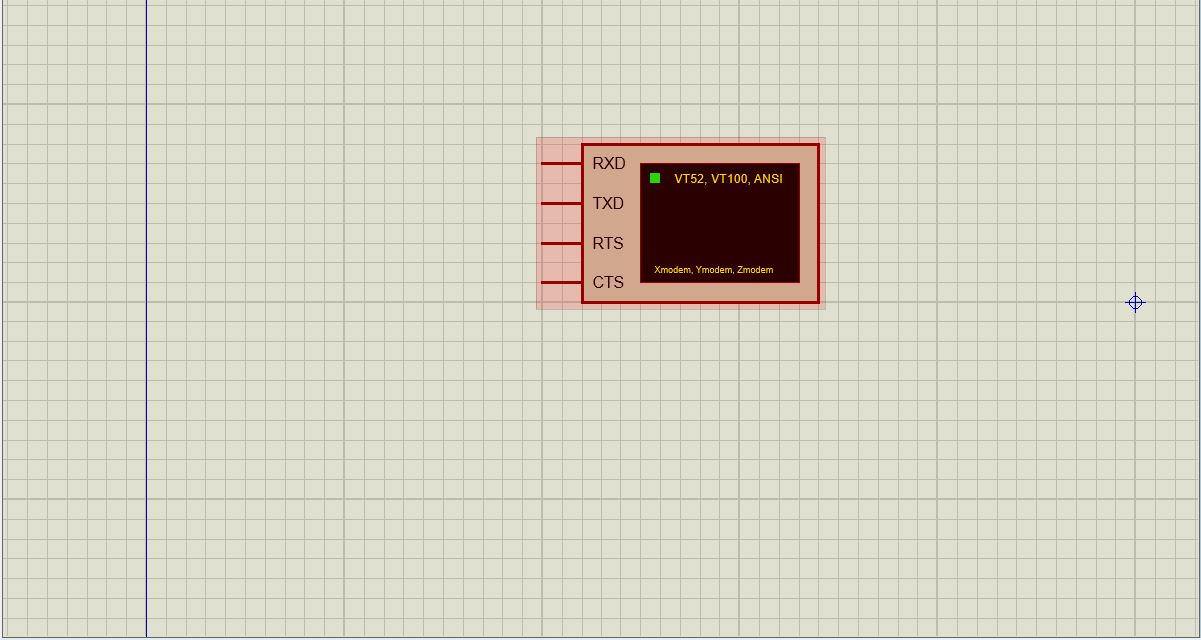
Serial Communication in Proteus
- As shown in the above image that the Virtual Terminal has four pins on it.
- Two pins are for data transmitting and receiving and other two terminals represents the handshaking between the components to be communicated.
- Let us first demonstrate the simple configuration of the Virtual Terminal as shown in the following figure:
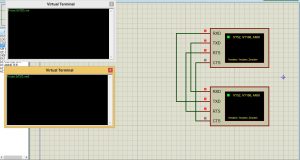
- As shown in the above image that the two Virtual Terminals are connected to each other in such a way that the receiving pin of the one Virtual Terminal is connected to the transmitting pin of the other.
- So as can be seen that the data on one terminal can be seen on the other Virtual Terminal.
- Now let us simulate the serial communication over UART between the Arduino microcontroller and the Virtual Terminal. Consider the circuit as shown in the following figure:

click here for Downlod
[otw_is sidebar=otw-sidebar-3]
How to use Virtual Terminal in Proteus with Arduino
- The Rx pin of the Arduino is connected to the Tx pin of the Virtual Terminal and the Tx pin of the Arduino is connected to the Rx pin of the Virtual Terminal.
- Let us now attach the HEX file of the code which lets the Arduino communicate serially over UART. The HEX file can be attached by double clicking the Arduino as shown in the following figure:
- Now hit the simulation button and the data that is send by the Arduino is displayed on the Terminal window as shown in the following figure:
- In the above discussion I have demonstrated the use of the Virtual Terminal from the simulation point of view. Let us now learn another important use of the Virtual Terminal.
- Suppose you have designed the hardware using the Arduino that can communicate over the UART that is the system let us say can send the reading of the temperature and receive the commands using the serial port.
- Now you want to see whether your hardware is working properly or not for this purpose you need to have some type of mechanism with the help of which you can see the data that is sent or received from the Arduino. Here again the Virtual Terminal of the Proteus serves the purpose.
COMPIM in Proteus
- It can be done very easily with the help of the module available in the Proteus which is called the COMPIM.
- This COMPIM acts as the virtual connection between the Virtual Terminal and the external hardware over the UART. Suppose that you have connected to your hardware consisting of the Arduino to the com port of your PC or laptop and the name of this com port is let us say COM9.
- By the way the name of the COM port to which Arduino is connected is determined from the control panel.
- Now double click on the COMPIM to open its properties and edit the properties according the situation that is write the name of the COM Port COM9 because you want to communicate to the Hardware that is connected to the COM9 as shown in the following figure:
- After adjusting the COM Port name adjust the baud rate as shown above. Now double click on the Virtual Terminal to adjust baud rate. The BAUD rate of the COMPIM and the Virtual Terminal should be same otherwise it will not work.
- Now the setup is ready when you hit the simulation button the Virtual Terminal will show the data that is send by the Hardware.
[otw_is sidebar=otw-sidebar-3]
How to Open Virtual Terminal in Proteus
- First of all open the Proteus Software and click on the P button to search for the components;
- Now in the search box type “COMPIM“
- That is all for now I hope this post would be helpful for you. In the next post I will come up with more interesting topics and applications of the Proteus. Till then stay connected, keep reading and enjoy learning.
- After reading this post the reader will be able to understand the importance of using the Virtual terminal. The reader will also be able to learn the serial communication and demonstrate it by using the Virtual Terminal in Proteus. While reading this post the reader should keep it in mind that the post only discuss the Virtual Terminal and its use in Proteus in order to understand the topic in detail the reader should learn about the UART (Universal Asynchronous Receiver Transmitter), RS 232 and serial communication. I will write on these topics later in my posts.How to Simulate Arduino in Proteus