
Arduino Leonardo for Beginners 23
[otw_is sidebar=otw-sidebar-1]In this post I will discuss about the Arduino Leonardo for Beginners. In the previous articles I have discussed about the Arduino UNO, NANO, MEGA, MICRO and PRO MINI. All of these boards have some of the features in common and some boards differ in some of their specifications. Arduino Leonardo like other Arduino microcontroller developments is the open source hardware and has some features that are common to other Arduino microcontroller development boards.
After reading this post the reader will be able to learn about the basics of the Arduino Leonardo, similarities and differences between Arduino Leonardo and other Arduino microcontroller boards and other important features of the Arduino Leonardo. So sit back, keep reading and enjoy learning.
[otw_is sidebar=otw-sidebar-2]
Arduino Leonardo Board:
Arduino Leonardo is the open source microcontroller development board and is based on the ATMEGA32U4 microcontroller IC. This microcontroller IC has many features that make it superior to that of the Arduino UNO and Arduino PRO MINI. It is important to note here that the Arduino UNO is based on the ATMEGA328P microcontroller IC. The Arduino Leonardo has total 20 digital inputs / output pins out of which 7 are PWM (Pulse Width Modulation) enabled and 12 are analog inputs pins. The phenomenon of the Pulse Width Modulation (PWM) and the importance of the PWM pins will be discussed in the post later. The Arduino Leonardo has one SPI (Serial Peripheral Interface) computer, one I2C (Inter-Integrated Circuit) computer bus and one UART (Universal Asynchronous Receiver Transmitter) based on TTL logic. An important thing that makes Arduino Leonardo unique among other Arduino microcontroller boards is that the microcontroller on which Leonardo is based that is ATMEGA32U4 has a built in USB interface thus eliminating the need of the external processor for the USB (Universal Interface Bus) interface as in the case of the Arduino UNO and MEGA. Another important point worth mentioning here is that the Digital input / output pins of the Arduino Leonardo can serve the purpose of the analog inputs also that is the digital pins can also acts as the Analog pins.
[otw_is sidebar=otw-sidebar-3]
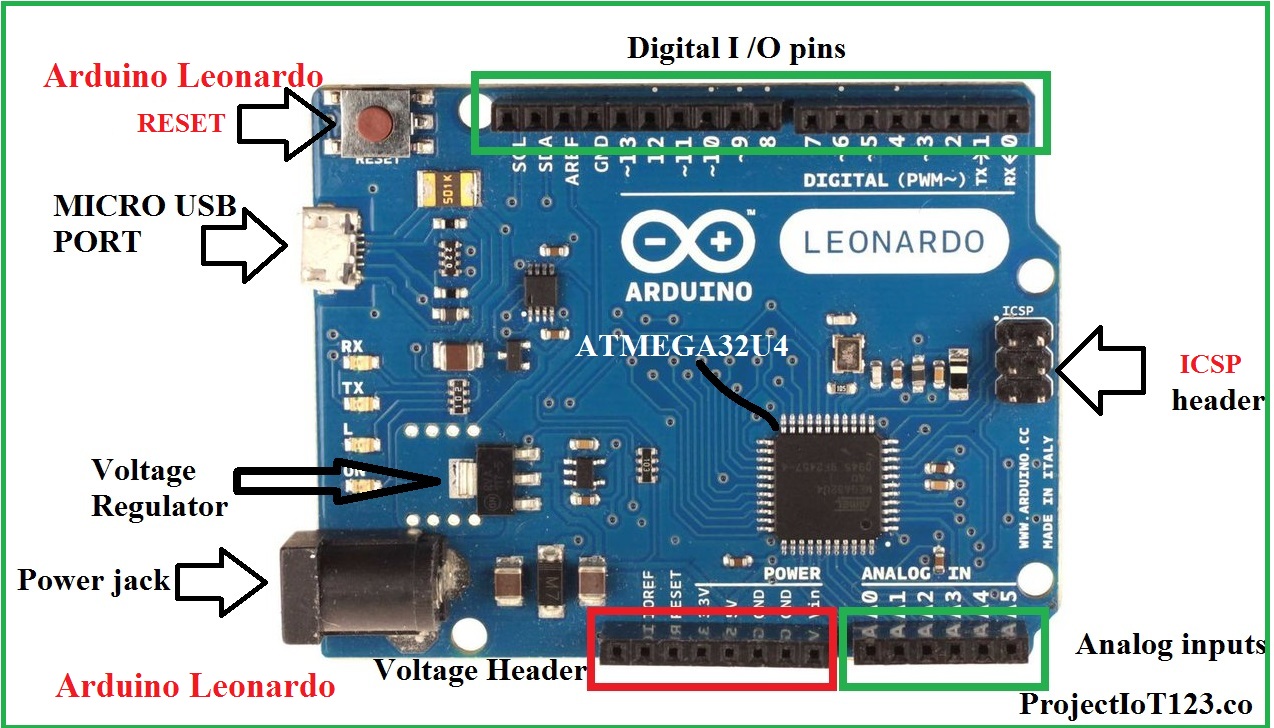
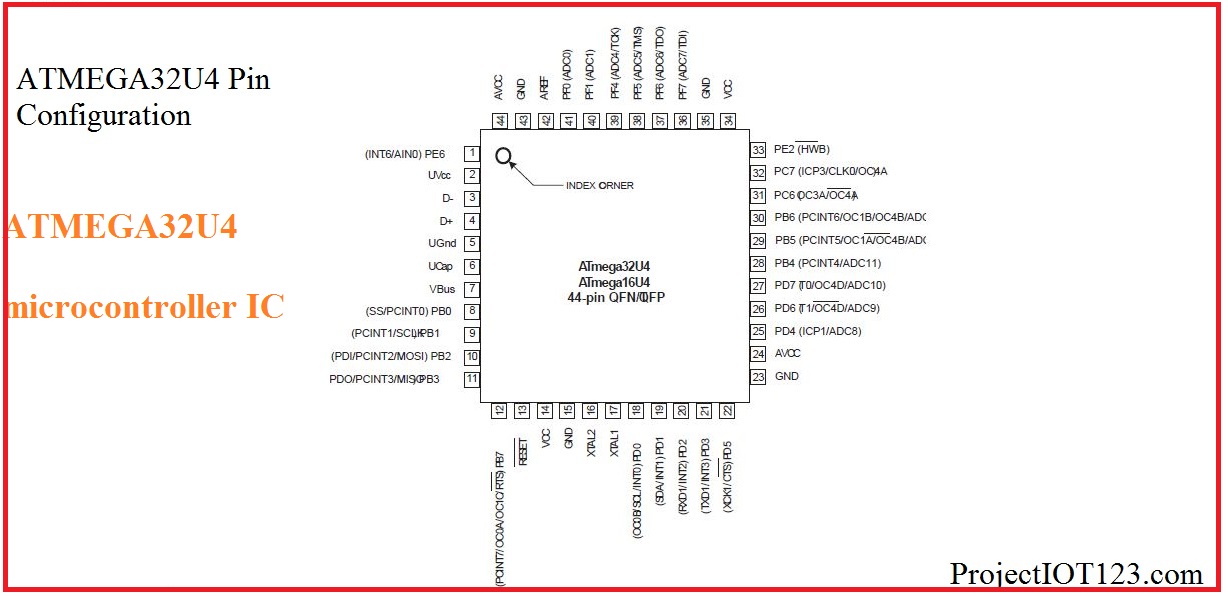
As shown in the image that the Arduino Leonardo board has Power jack, micro USB port ICSP header and reset button mounted on board. The Leonardo can be powered up either through the power jack or through the Vin pin of the voltage header. The micro USB port is used to connect the Leonardo board to the computer USB COMM port. An important point worth mentioning here is that the Arduino Leonardo is based on 16 MHz oscillator that is opposite to its counterpart boards that are based on the same microcontroller board (ATMEGA32U4) which have provision of 16 MHz or 8 MHz depending upon the power supply. The pin configuration of the ATMEGA32U4 microcontroller IC is shown in the following figure:
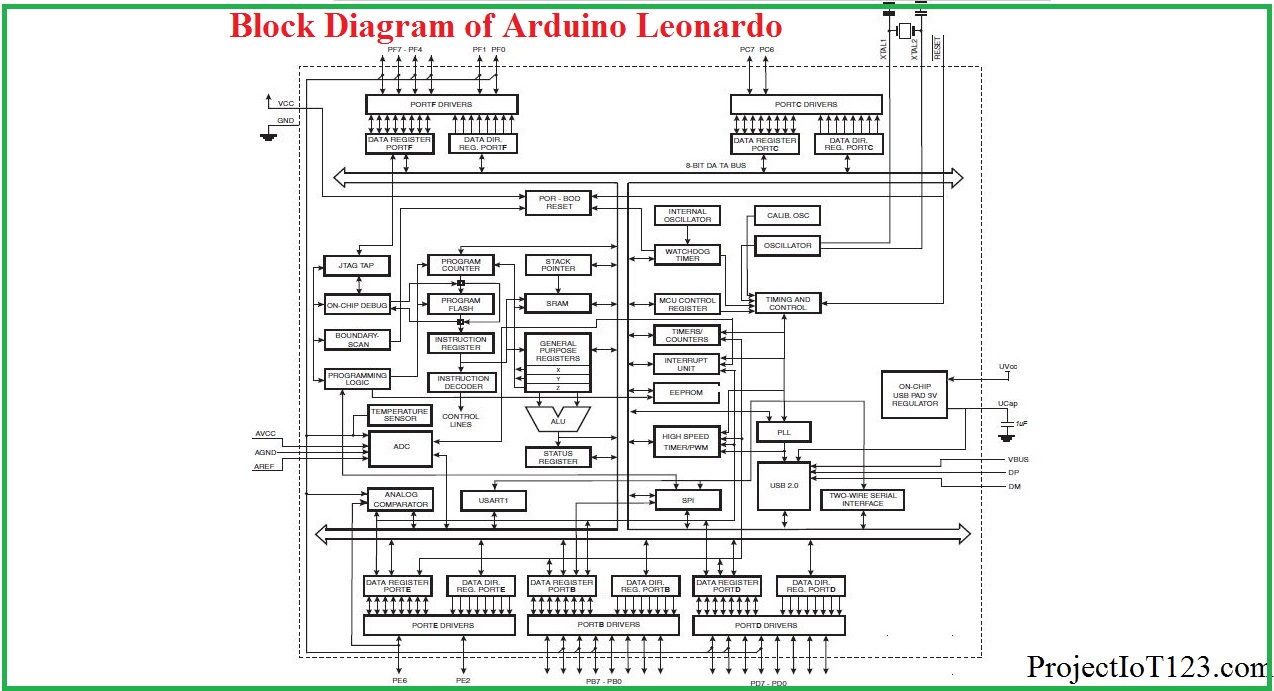
The block diagram of the architecture of the ATMEGA32U4 is shown in the following figure:
Arduino Integrated Development Environment (IDE):
In the post on the Arduino UNO we learned that the Arduino UNO can easily be programmed using the Arduino IDE. The Arduino LEONARDO can also be programmed in the similar way; that is the programming of the Arduino LEONARDO is not different from that of the Arduino UNO however it should be kept in mind that Arduino MICRO has different number of pins and different pin configuration. The care should be taken while configuring the Arduino LEONARDO pins. As most of you might have known that in order to program a microcontroller one need to write the code in the editor, and then compile that code in the compiler after which you get the HEX file of that code and later upload that HEX file in the microcontroller IC using another program. In case of Arduino all these steps are performed in single software which is called the Arduino IDE. By integrated Development Environment it means that all the steps that editor, compiler, burner are integrated in the same software. In short Arduino LEONARDO is quite easy to program it is just a matter of few clicks. I will go through in detail about how to write a code and upload it in Arduino LEONARDO later in the post. Note that the Arduino LEONARDO has the micro USB port on it which means that USB cable used for programming the Arduino LEONARDO is different from that of the Arduino UNO and Arduino MEGA. Before concluding this section it is important to note here that the drivers for the Arduino Leonardo should be installed in the computer before uploading the code because otherwise the Arduino board would be recognized by the computer. The drivers are easily installed automatically whenever the Leonardo is plugged into the USB COMM PORT of the computer bit not in the case of Windows 7, VISTA and 10 in which case you need to install the drivers manually. One last thing is that before uploading the code on the Arduino Leonardo do not forget to select the Arduino Leonardo board.
[otw_is sidebar=otw-sidebar-3]
Arduino Leonardo features:
Let us now learn some of the general specifications of the Arduino Leonardo microcontroller development board. As stated earlier that the Leonardo is based on the ATMEGA32U4 microcontroller IC so the basic features of the Arduino Leonardo are essentially that of the ATMEGA32U4 microcontroller IC. Some of the general specifications of the Arduino Leonardo are as shown follows:
- Microcontroller IC: Microchip ATMEGA 32U4
- Operating Voltage: 5 Volts
- Input Voltage: The input voltage from 7 to 12 volts can be applied to power up the Arduino Leonardo as it has on board voltage regulator.
- Digital I/O Pins: 20 (of which 7 provide PWM (Pulse Width Modulation) output)
- Analog Input Pins: 12
- DC Current per I/O Pin: 40 mA (This is the current that can be sourced or sink into and out of the Input / Output pins)
- DC Current for 3.3V Pin: 50 mA
- Flash Memory: 32 KB out of which 4 KB is used by boot loader
- SRAM: 2.5 KB
- EEPROM: 1 KB
- Clock Speed: 16 MHz
As can be seen in the specifications that the Arduino UNO and Arduino Leonardo shares many of the properties but also differs in some features. They have same amount of EEPROM and SRAM. The detailed description of each feature is out of the scope of this post but will be discussed in detail later in the next post.
Arduino Leonardo Pinout:
Let us now dive into the discussion about the pinout of the Arduino Leonardo. As described earlier that the Arduino Leonardo is based on the ATMEGA32U4 microcontroller IC so it follows that the pinout of the Arduino Leonardo is simply that of the ATMEGA32U4 microcontroller but note here that the Arduino Leonardo has its own nomenclature for its pins and here I will use the nomenclature used by the Arduino for pin reference.
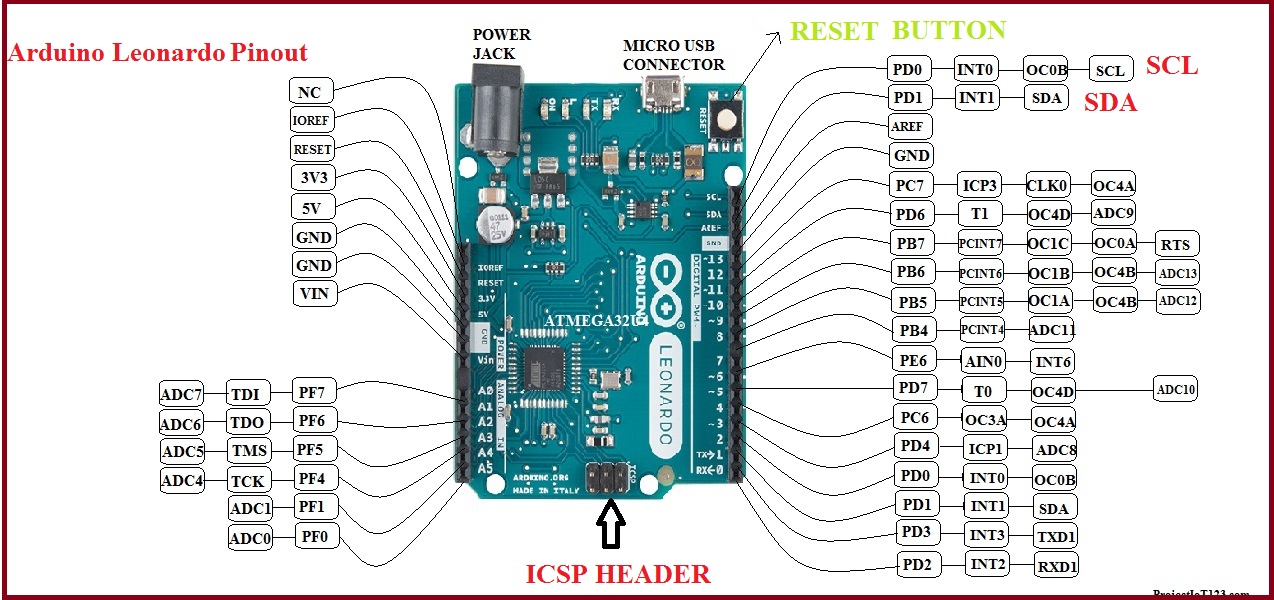
As can be seen on the Arduino Leonardo that there are three headers mounted on board. The headers on the Arduino MICRO bears the Digital Input / Output pins, Analog input pins and the Power pins.
[otw_is sidebar=otw-sidebar-3]
As pointed out earlier that the Arduino Leonardo has total 20 Digital Input / Output pins. The digital Input / Output pins can receive a digital signal or transfer a digital signal. Out of these 20 Digital Input / Output pins 7 are PWM (Pulse Width Modulation) enabled and some pins can also be configured as either SPI (Serial Peripheral Interface) or I2C (Inter-Integrated Circuit) computer bus. The Arduino Leonardo also has one UART with Rx and Tx signals on pin number 0 and 1 respectively that are used for serial communication. The headers on the other side of the Arduino Leonardo bear the voltage pins and the Analog pins. There are total 12 analog pins on the Arduino Leonardo and 6 out of them ranging from A0 – A5 are available on this header. Unlike Digital pins these pins can just act as Input pins, that is these pins can only receive signal and cannot provide signal or voltage, that is why they are called Analog inputs. These analog inputs are actually the inputs of the Analog to Digital Converter inside the ATMEGA 32U4 microcontroller. These pins can be connected to the output of the analog sensors. 12 different analog sensors can be connected to the Arduino Leonardo simultaneously. The analog pins of the Arduino Leonardo need some more discussion which will follow in the next sections.
The third header of the Arduino Leonardo bears the voltage pins that are used to power up the Arduino Leonardo board, these pins are also used to deliver power from the Arduino Leonardo board to other peripheral devices or the sensors attached to the Arduino Leonardo microcontroller development board.
Let us now discuss in detail the digital Input / Output pins, Analog input pins and Voltage pins of the Arduino Leonardo.
Arduino Leonardo Digital Input / Output Pins:
As described in the previous section that the Arduino Leonardo has total 20 digital input / output pins out of which 7 input / output pins are PWM enabled. Some of these Digital Input / Output pins can also serve as the SPI (Serial Peripheral Interface) or I2C interface (Inter-Integrated Circuit). The detailed description is shown in the following figure:
The function that the digital input / output pins perform depends upon the coding of the Arduino Leonardo. That is whether the pin number 2 and 3 functions simply as Digital Input / Output or they are used as the Inter-Integrated Circuit(I2C) bus depends upon the coding that specifies their functionality using particular functions. It is also important to note here that the Digital Input / Output pins are called as Input / Output because either they can be used as Input in which case they are intended to receive the signals from sensor or transducer (digital) or they can be used as Output in which case they drive the actuators such as relays. The functionality of the Digital Input / Output pins as either Input or Output is determined by the code also. It is important to realize here that digital input / output pins can only supply a limited amount of current which is not sufficient to drive the motors or relays therefore we need to use drivers such as stepper motor driver or L298 DC motor driver. I will come to the coding of the Arduino MICRO later in this post. Another point worth mentioning is that seven out of the 20 digital input / output pins 7 are PWM enabled pins that is these pins can provide PWM (Pulse Width Modulation) signal as output. These PWM pins find applications in which we need to regulate something for example the speed of the motor or brightness of the lamp.
Arduino Leonardo I2C Pins:
The I2C serial communication bus as shown in the above image is embedded on Digital Input / Output pins it is opposite to that of the Arduino UNO, NANO and PRO MINI in which this computer bus is present on the analog side. Before concluding this section it is important to note that SPI interface is present on the ICSP header and has no connection on the Digital Input / Output pins as in the case of the Arduino UNO.
Arduino Leonardo Analog Pins:
As mentioned previously that the Arduino Leonardo has 12 Analog inputs which means that 12 different analog sensors can be interfaced to the Arduino Leonardo and the Arduino Leonardo can fetch the data from these 12 analog sensors simultaneously. Unlike the Digital Input / Output pins these Analog Pins are the input only that these pins can only receive the analog signals that is read the signals and cannot drive the signal outwards. An interesting point to note that all the Analog pins on the Arduino Leonardo board can also acts as the digital input / output pins. The analog pins other than the pins A0-A5 are available on the digital input / output pins 4, 6, 8, 9, 10, 12. Note in the picture that the digital pins with the dot above them act as the analog inputs.
Arduino Leonardo PWM Pins:
Let us now discuss the PWM pins of the Arduino Leonardo in some detail. As mentioned in the previous section that the Arduino Leonardo has 7 PWM pins which are numbered as 3, 5, 6, 9, 10, 11 and 13. These digital pins can deliver the PWM signal as output. The PWM is the abbreviation of the Pulse Width Modulation and it is a phenomenon in which we adjust the width of the pulse according to the requirement of the applications. For example if one needs to regulate the speed of the motor or the brightness of the lamp this can be achieved by varying the width of the PWM signal. The power delivered by the PWM signal is the average of the signal for which it is zero and for which it is maximum. If the width of the PWM signal for which the signal remains HIGH is greater than more power will be delivered and thus reducing the width will cause the reduction in the power delivered. The width of the PWM signal for which the signal remains HIGH during its time period is referred to as the Duty Cycle of the PWM signal. The PWM pins are also used to control the angular position of the Servo motors.
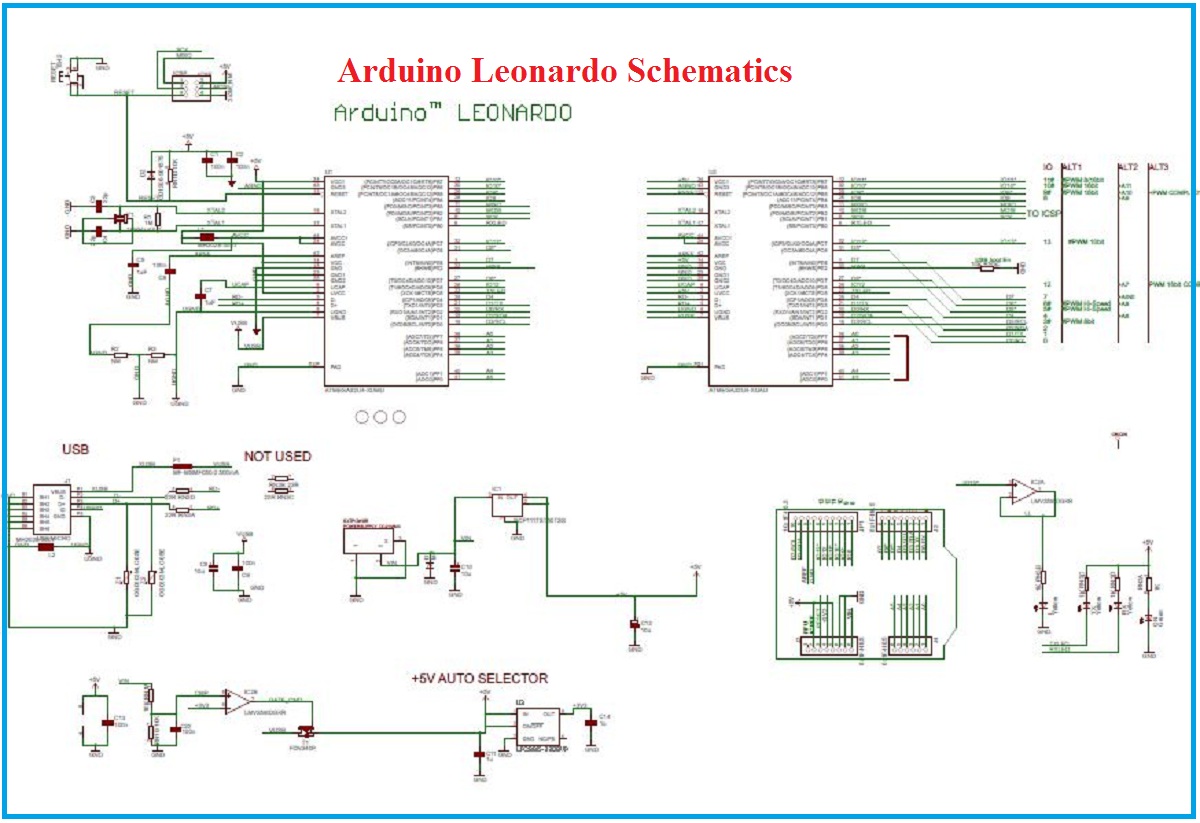
Arduino Leonardo Schematics:
The Arduino Leonardo has simplest schematics among all the boards and almost similar to that of the Arduino MICRO. As told earlier that the Arduino Leonardo is based on the ATMEGA32U4 microcontroller which has a built in USB interface which means that unlike the Arduino UNO and Arduino PRO MINI the user does not need to connect the USB to UART bridge for programming the microcontroller, the schematics of the Arduino MICRO is as shown in the following image:
Arduino Leonardo Applications:
Before discussing the programming language of the Arduino Leonardo let us first know the applications of the Arduino Leonardo for motivation. So basically the Arduino Leonardo can be used in any system that requires the microcontroller. It is now the most commonly used microcontroller development board that is equally popular among the hobbyists and the engineering students. Some of the embedded systems in which the Arduino can be used are listed below:
- IR remote based Home Automation System.
- Bluetooth controlled Home Automation System.
- IoT enabled Home Automation System.
- RC car.
- Mobile lifter.
- Hurdle Avoiding Vehicle.
- Wall climbing vehicle.
- Autonomous vehicle.
- Robotic arm.
Arduino Leonardo programming language:
One of the perks that make Arduino Leonardo quite popular among the hobbyists and beginners is it’s easy to use programming language and programming. The programming language used by the Arduino MICRO is the C++. The Arduino Leonardo IDE has a well-defined function for each task that is easy to remember. As an example the function that specifies the Arduino Leonardo digital Input / Output pin to work as input is:
pinMode(12,INPUT);
Here in this function there are two arguments. First argument is the pin number which we want to make input or output and second argument specifies the property that is input or output to the pin number used. The detailed discussion on programming the Arduino Leonardo will come later in the next posts.
That is all for now I hope this post(Arduino Leonardo for Beginners) would be helpful for you. In the next post I will come up with more interesting topics. Till then stay connected, keep reading and enjoy learning.
Very informative and fantastic structure of subject material, now that’s user pleasant (:.
I discovered your blog site on google and check a few of your early posts. Continue to keep up the very good operate. I just additional up your RSS feed to my MSN News Reader. Seeking forward to reading more from you later on!…
We’re a group of volunteers and starting a brand new scheme in our community. Your web site offered us with useful information to paintings on. You’ve performed a formidable task and our whole community will probably be thankful to you.
There is noticeably a bundle to know about this. I assume you made certain nice points in features also.
Heya i’m for the first time here. I found this board and I find It truly useful & it helped me out a lot. I hope to give something back and help others like you helped me.
What is Alpha Tonic? Alpha Tonic stands as a natural health supplement designed to comprehensively address men’s overall well-being.
Those are yours alright! . We at least need to get these people stealing images to start blogging! They probably just did a image search and grabbed them. They look good though!
I do trust all of the ideas you’ve presented in your post. They’re really convincing and will certainly work. Still, the posts are very quick for starters. May you please extend them a little from subsequent time? Thank you for the post.
Thank you for the sensible critique. Me and my neighbor were just preparing to do some research about this. We got a grab a book from our area library but I think I learned more from this post. I’m very glad to see such magnificent info being shared freely out there.
I’m curious to find out what blog platform you have been using? I’m having some small security problems with my latest site and I would like to find something more risk-free. Do you have any solutions?
It is very comforting to see that others are suffering from the same problem as you, wow!
I like what you guys tend to be up too. This type of clever work and coverage! Keep up the wonderful works guys I’ve included you guys to blogroll.
Usually I do not read post on blogs, but I wish to say that this write-up very forced me to try and do it! Your writing style has been surprised me. Thanks, very nice article.
mail order pharmacy india https://indiaph24.store/# reputable indian online pharmacy
top 10 online pharmacy in india
The very crux of your writing while sounding reasonable in the beginning, did not work perfectly with me personally after some time. Someplace throughout the sentences you managed to make me a believer unfortunately only for a while. I nevertheless have got a problem with your jumps in logic and one might do nicely to help fill in those gaps. In the event that you can accomplish that, I will definitely end up being fascinated.
https://canadaph24.pro/# canadian pharmacy online store
http://mexicoph24.life/# pharmacies in mexico that ship to usa
pharmacies in mexico that ship to usa: Mexican Pharmacy Online – mexican border pharmacies shipping to usa
best india pharmacy http://indiaph24.store/# india pharmacy
Online medicine order
п»їlegitimate online pharmacies india indian pharmacy india online pharmacy
Wow! Thank you! I permanently needed to write on my blog something like that. Can I take a fragment of your post to my blog?
I am not rattling superb with English but I line up this real easy to interpret.
I am delighted that I discovered this site, exactly the right info that I was searching for! .