
Interfacing 7 Segment Display with Arduino in Proteus 19
[otw_is sidebar=otw-sidebar-1]In this article I will discuss about Interfacing 7 Segment Display with Arduino in Proteus.and how to simulate the circuit containing Arduino interfaced with Seven Segment Display in Proteus. Seven segment display is simply a display for displaying the numeric data. It is commonly used in different kinds of timers, stop watches and desktops clocks. So in this article the discussion will be oriented around how to interface the Seven Segment Display with Arduino and simulate the code and circuit using Proteus. The configuration of the LEDs in the Seven Segment Display looks like the one in the image below:
[otw_is sidebar=otw-sidebar-2]

7 segment display pinout
[dt_gap height=”10″ /]
In the paragraphs to follow I will discuss the Seven Segment Display pinout(7 segment display pinout) , the pin out of the of the Seven Segment Displays, interface of Arduino and Seven Segment Displays, how to write code for the Seven Segment Display counting in Arduino and then finally simulate the circuit in the Proteus. So sit back, keep reading and enjoy learning of 7 segment display pinout
7 Segment Displays
As described in the above paragraph the Seven Segment Display or sometimes called the Seven Segment Indicator is a type electronic display that is used for displaying the numeric data. The seven segment display can be found in various applications such as digital clocks, electronic meters, calculators and other electronic circuits which need to display the numeric data to the user.
Note:Two types of Seven Segments are available in the market depending upon their internal construction
- Common anode Seven Segment Display.
- Common Cathode Seven Segment Display.
[otw_is sidebar=otw-sidebar-3]
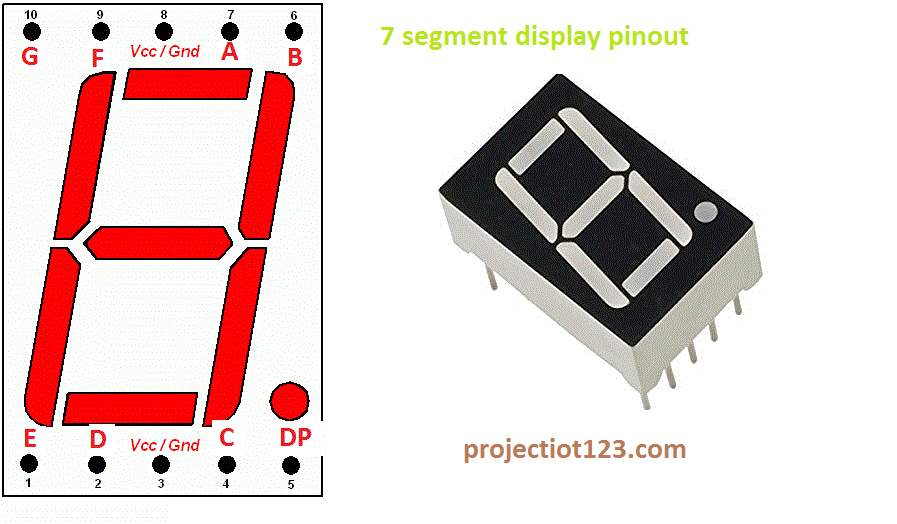
The basic circuit of either of the display is same the only difference as clear by the name of each is that one is common anode with the data signals intended to applied on cathode pins and other is common cathode with data signals applied on the anode pins of the display. The pinout of the Seven Segment Display is shown in the figure below:
Interfacing 7 Segment Display with Arduino in Proteus
As represented in the figure each LED in the Seven Segment Display is denoted by the Alphabets a to g. These LEDs are turned on in the particular manner to display any numeral from 1 to 0. As also represented in the figure these LEDs are controlled by the Pin numbers specified for each LED.
The concept of the common anode can be seen in the following figure:
[/vc_column_text][/vc_column][/vc_row][vc_row][vc_column][vc_btn title=”download this file” style=”classic” color=”green” link=”url:http%3A%2F%2Fprojectiot123.com%2F2019%2F03%2F10%2Fultrasonic-sensor-library-in-proteus%2F|title:flex%20sensor%20library%20for%20proteus|target:%20_blank|”][/vc_column][/vc_row]
In the similar way the concept of the common cathode Seven Segment Display is shown in the following figure:
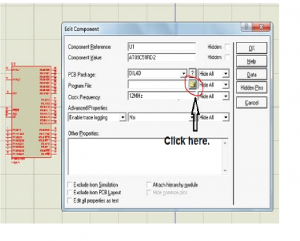
7 segment display pcb package proteus
The Proteus is very powerful tool for circuit simulation, PCB designing and 3D layout for the circuit. It is always helpful to simulate the circuit before actually implementing it physically. Proteus has built in library for the Seven Segment Display so you just need to search the Seven Segment Display in the Proteus and double click to add it in the workspace.
7 segment display pcb package proteus layout

Seven Segment Display and Proteus:
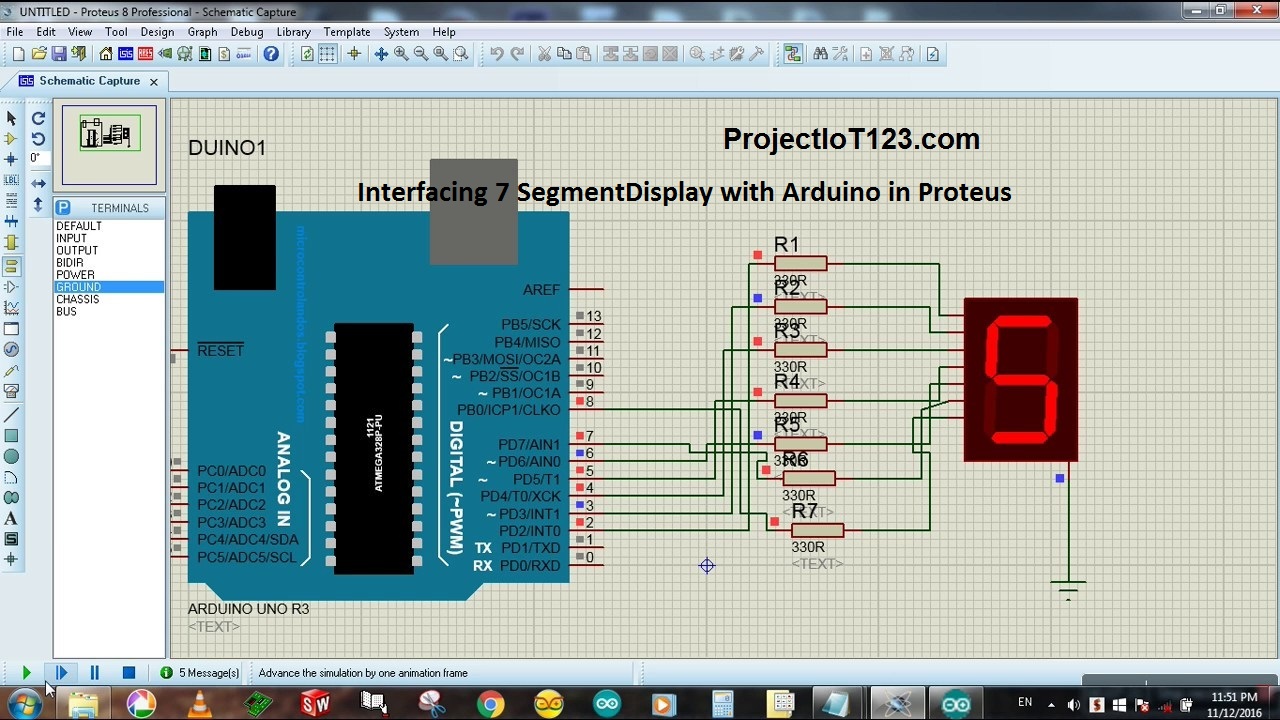
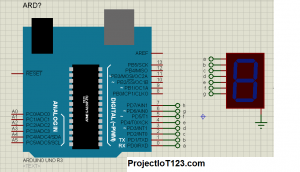
After you have included the Seven Segment Display in the Proteus it’s now time to add the Arduino in the Proteus. This can also be done by searching for the Arduino in the Proteus and then double click to add Arduino in the Proteus workspace. Once you included both the Arduino and Seven Segment Display in the Proteus it will look like the one in the following image:
It is now time to write the code for the Arduino to drive the Seven Segment Display. At this point I have assumed that you have already installed the Arduino library for the Proteus.
[otw_is sidebar=otw-sidebar-2]
Arduino Code for Seven Segment Display:
Now open the Arduino IDE and write the code for driving the Seven Segment Display. You can simply copy and paste the code which I have written in the following:
void setup() {
// define pin modes
pinMode(2,OUTPUT);
pinMode(3,OUTPUT);
pinMode(4,OUTPUT);
pinMode(5,OUTPUT);
pinMode(6,OUTPUT);
pinMode(7,OUTPUT);
pinMode(8,OUTPUT);
}
void loop() {
// loop to turn leds od seven seg ON
for(int i=2;i<9;i++)
{ digitalWrite(i,HIGH);
delay(600);
}
// loop to turn leds od seven seg OFF
for(int i=2;i<9;i++)
{ digitalWrite(i,LOW);
delay(600);
}
delay(1000);
}
Circuit Assembling in Proteus:
After you have written the code assemble the circuit in the Proteus before compiling the code. The good thing is Arduino can supply enough current from its digital input/output pins to drive the Seven Segment Display so you do not need to insert any driving IC to drive the Segment Segment Display. The circuit after hooking up the Arduino with the Seven Segment Display looks like the one in the following figure:
Setting the HEX code in the Proteus:
Now you need the HEX file for the code you have written in the Arduino IDE. This HEX file will be uploaded in the Proteus which will be ready for simulation. I have already discussed the about how to create HEX. I am repeating it
Open your Arduino IDE, click on the File, go into preferences and check the boxes with compilation and uploading.
[otw_is sidebar=otw-sidebar-3]
When you have check the boxes highlighted in the above write the code and then compile.
Once you have compiled the code by clicking the Verify button at the top left corner of the Arduino IDE. The Arduino IDE will automatically create the HEX file and give the link of it at the bottom.
Go to the link as specified by your Arduino IDE and you can find your HEX file there.
After you have made the HEX file it should be in some way given to the Proteus so that Proteus can use this HEX file to simulate the code and thus simulate the circuit. I am discussing here the steps for setting the HEX file in Proteus.
Open you Proteus.
Browse for the HEX file in the location where your newly created hex file is placed.
Finally click on the file and the hex file will be uploaded in the Proteus.
Now the Proteus is ready for simulating the Arduino circuit.
7 segment display arduino library
4 digit 7 segment displays use 12 digital i/o pins. You may need more pins if your display has colons or apostrophes.
you can Download sparkfun 7 segment library from here
4 seven segment display arduino in proteus
4 seven segment display arduino in proteus and up down counter using arduino
2 seven segment display arduino in proteus
pic microcontroller for beginners
This is all about today’s article Interfacing 7 Segment Display with Arduino in Proteus. I hope it would be helpful for you.
you can download from this proteus simulation
dear can you tell me which plugin you are using for Google adsense
good article
Having read thiis I believed it was rather informative.
I appreciate you spesnding somje time and enefgy to putt this informative article together.
I once again find myself personally spending a significant amount of time borh reading
and commenting. But so what, itt was still worth it!
Also visit my webpage :: https://telegra.ph/Kakie-sloty-v-onlajn-kazino-Vavada-mozhno-nazvat-naibolee-populyarnymi-12-23
Hello would you mind stating which blog platform you’re working with? I’m going to start my own blog in the near future but I’m having a hard time making a decision between BlogEngine/Wordpress/B2evolution and Drupal. The reason I ask is because your design seems different then most blogs and I’m looking for something completely unique. P.S Apologies for being off-topic but I had to ask!
Forr latest news you have to pay a visit web and on world-wide-web I found this site ass a best website for latest updates.
Feel free tto surf to my site: vavadaonline.mystrikingly.com
I have recently started a website, the information you provide on this web site has helped me tremendously. Thanks for all of your time & work.
Wow, marvelous blog layout! How long have you been blogging for? you made blogging look easy. The overall look of your site is magnificent, let alone the content!
Wow, fantastic blog structure! How long have you ever been blogging for?
you made running a blog look easy. The whole glance of your site is great,
let alone the content! You can see similar here
ecommerce
of course like your web-site however you have to take a look at the spelling on several of your posts. Several of them are rife with spelling problems and I in finding it very troublesome to inform the truth then again I will surely come back again.
With their specialized skills and round-the-clock availability, emergency plumbing experts offer a lifeline when disaster strikes. But what sets these professionals apart, and how do they fare in the eyes of those who have called upon their services in times of need?
Loving the information on this web site, you have done outstanding job on the articles.
I think other website proprietors should take this website as an model, very clean and wonderful user genial design.
Regards for this fantastic post, I am glad I detected this web site on yahoo.
This web page can be a walk-via for all the data you wanted about this and didn’t know who to ask. Glimpse right here, and you’ll definitely uncover it.
Thanx for the effort, keep up the good work Great work, I am going to start a small Blog Engine course work using your site I hope you enjoy blogging with the popular BlogEngine.net.Thethoughts you express are really awesome. Hope you will right some more posts.
I’m still learning from you, as I’m improving myself. I certainly enjoy reading all that is posted on your website.Keep the tips coming. I enjoyed it!
FitSpresso stands out as a leading weight loss product currently dominating the market. This potent supplement asserts its ability to facilitate healthy weight loss naturally, free from any adverse side effects. Its formulation incorporates clinically studied ingredients that synergistically contribute to promoting natural fat burning, elevating metabolism, and sustaining enduring weight loss.
Sight Care is a 100 natural and safe supplement that was developed after many years of studies by the best scientists, made to solve the nutritional deficiencies of our eyes, rejuvenating and restoring our perfect vision.
I’m not sure why but this site is loading extremely slow for me. Is anyone else having this problem or is it a problem on my end? I’ll check back later on and see if the problem still exists.